The Calendar app on Windows 10 is a handy tool to manage events, and in this guide, you'll learn the steps to start using it.
On Windows 10, Calendar is a built-in app designed to help you manage your schedule, including meetings, reminders, appointments, and other events.
Although you may be able to find many alternative tools, the Calendar app includes all the essential features that you need to organize and stay on top of all your events. It's also compatible with most third-party calendar services. And unlike other online solutions, the app works offline, so you don't have to sign in every time you want to check your schedule, which makes it an excellent solution for anyone who needs to work from home or manage personal events.
In this Windows 10 guide, we walk you through everything you need to know to start using the Calendar app to manage meetings, reminders, appointments, and other events.
- How to add an account on Calendar
- How to customize and share calendars on Calendar
- How to add calendar events on Calendar
- How to add popular calendars on Calendar
- How to sync events on Calendar
- How to personalize your experience on Calendar
- How to change settings on Calendar
- How to change weather settings on Calendar
Office 365
Get subscribed
![]()
From $70 at Microsoft
Office 365 gives you full access to all the apps and perks, such as 1TB OneDrive storage and Skype minutes. You can also install Word, Excel, PowerPoint, Outlook, and other apps on up to five devices, and depending on the subscription, you can share the account with up to five people.
How to add an account on Calendar
The Calendar app for Windows 10 allows you to bring and organize calendar events from many third-party services, including Outlook.com, Microsoft 365, Google, Yahoo, and Apple iCloud.
To add a new account to manage your calendar events on Windows 10, use these steps:
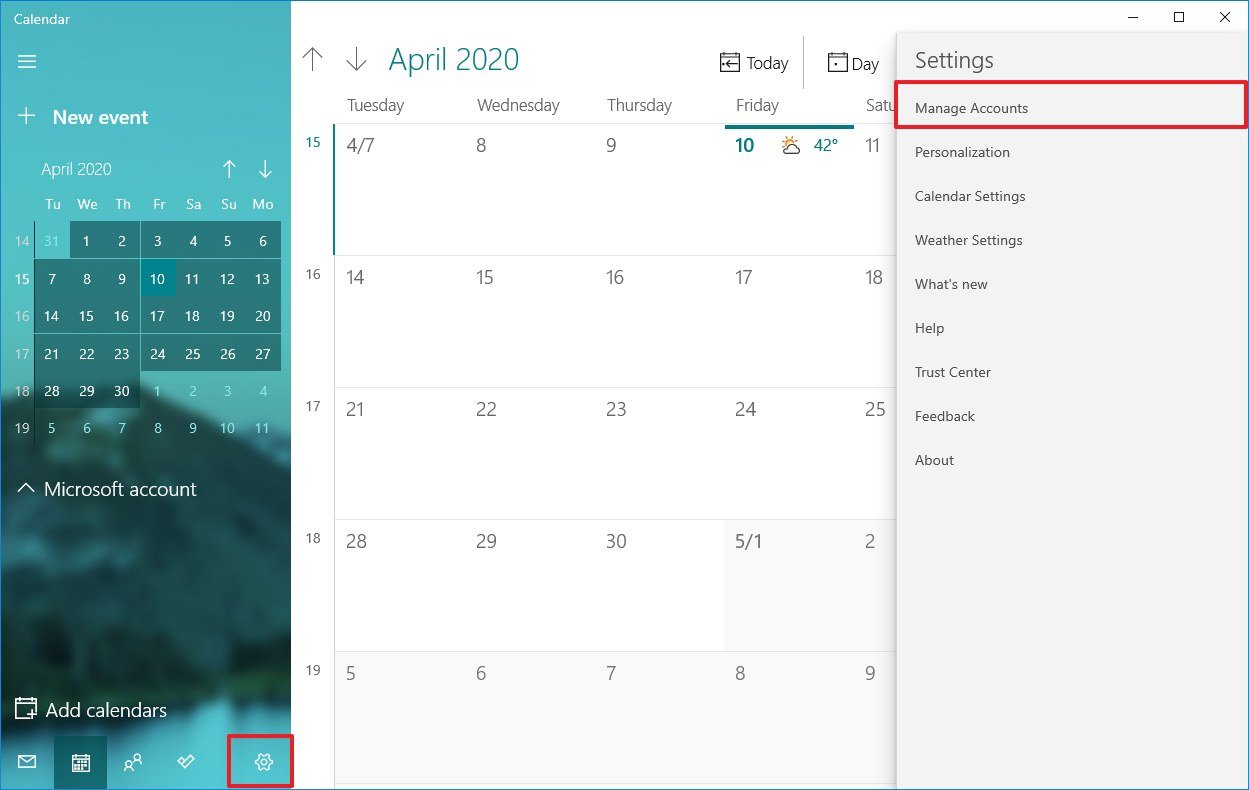
- Open Calendar.
- Click on the Settings (gear) button in the bottom-left corner.
-
Click on Manage Accounts in the top-right corner.
-
Click the Add account button.
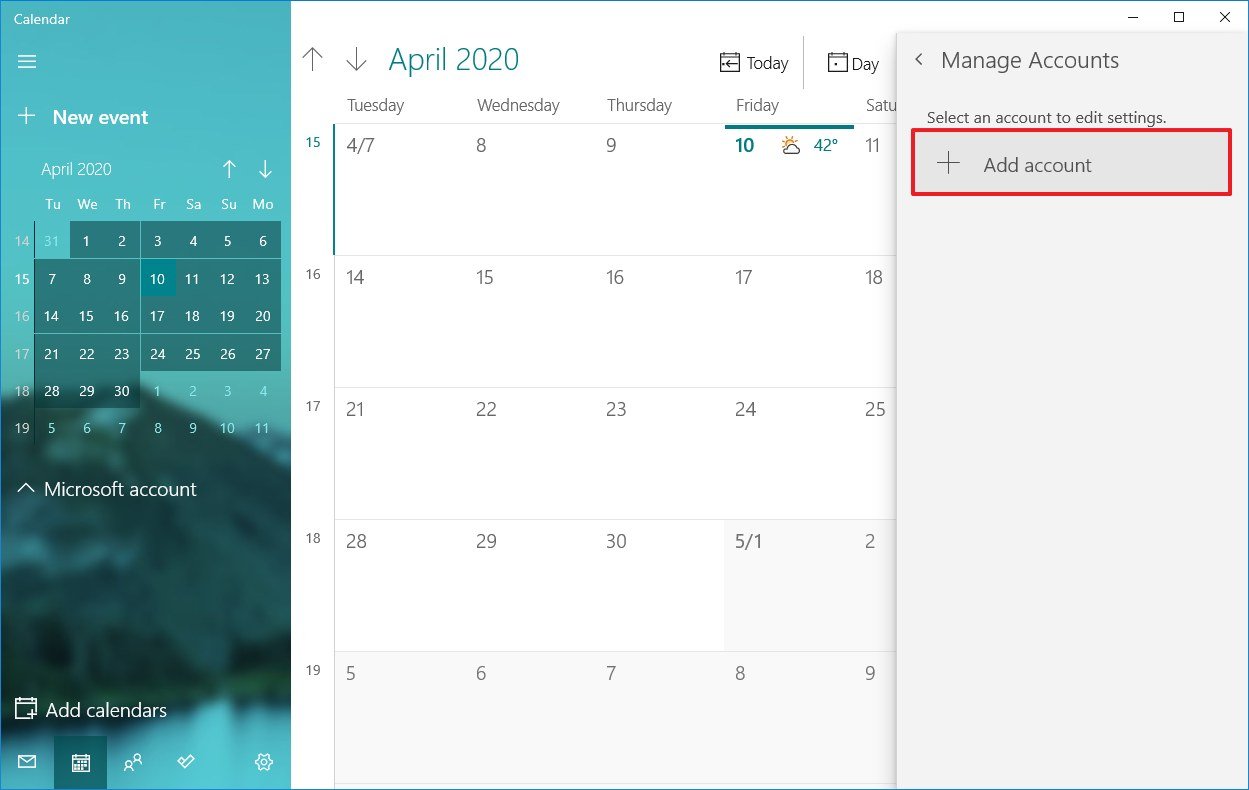
Quick tip: If you already use the Mail app, the accounts will show up on this list.
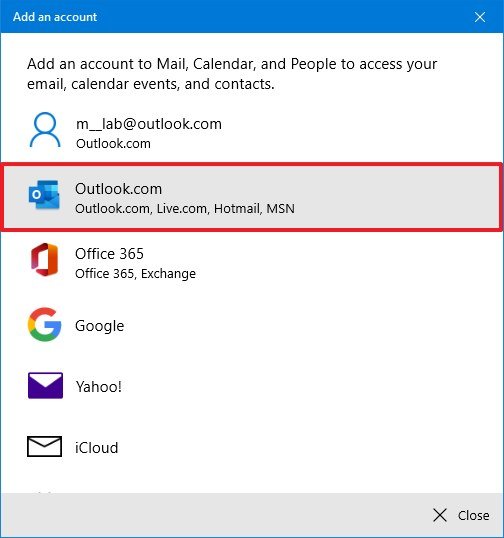
-
Select the service that you use for calendar events. For example, Outlook.com, but you can choose from a number of services, including:
- Outlook.com.
- Microsoft 365 (Office 365).
- Google (Gmail).
- Yahoo.
- iCloud.
- (Optional) Click the Advanced setup option to add other internet mail services using POP or IMAP.
- Continue with the on-screen directions to finish adding the account using the account credentials.
Once you complete these steps, the events from the service you configured should start syncing on the device. You can add as many accounts as you need. If you have another personal or work account, just repeat the same steps outlined above.
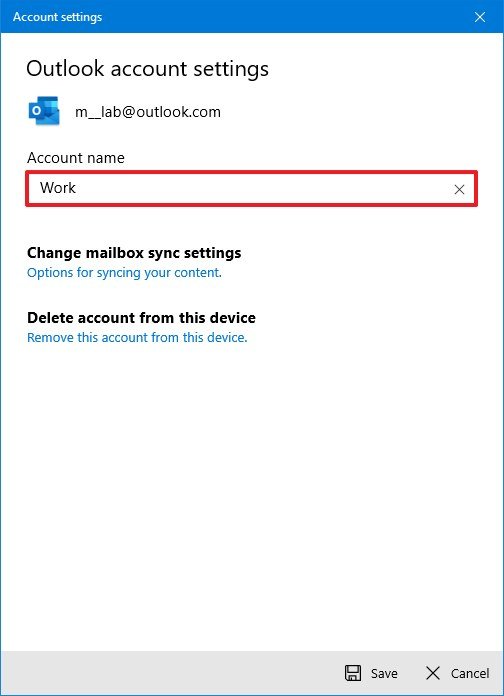
Change calendar account name
When setting up a new account, the Calendar app uses the name of service as the name for the account. If you want to better identify the accounts, you can change the name to something more descriptive. For example, you can use something like "Work" or "Personal," or you can use the email address.
To change the calendar account name, use these steps:
- Open Calendar.
- Click on the Settings (gear) button in the bottom-left corner.
-
Click on Manage Accounts in the top-right corner.
- Click the account you want to add a different name.
-
Confirm the new name.
Quick tip: If you made a mistake, you could also delete the account from the same page.
- Click the Save button.
Once you complete the steps, the account will be easier to identify from the left side navigation pane.
How to customize and share calendars on Calendar
After adding a new account, you have various option to customize and share each calendar.
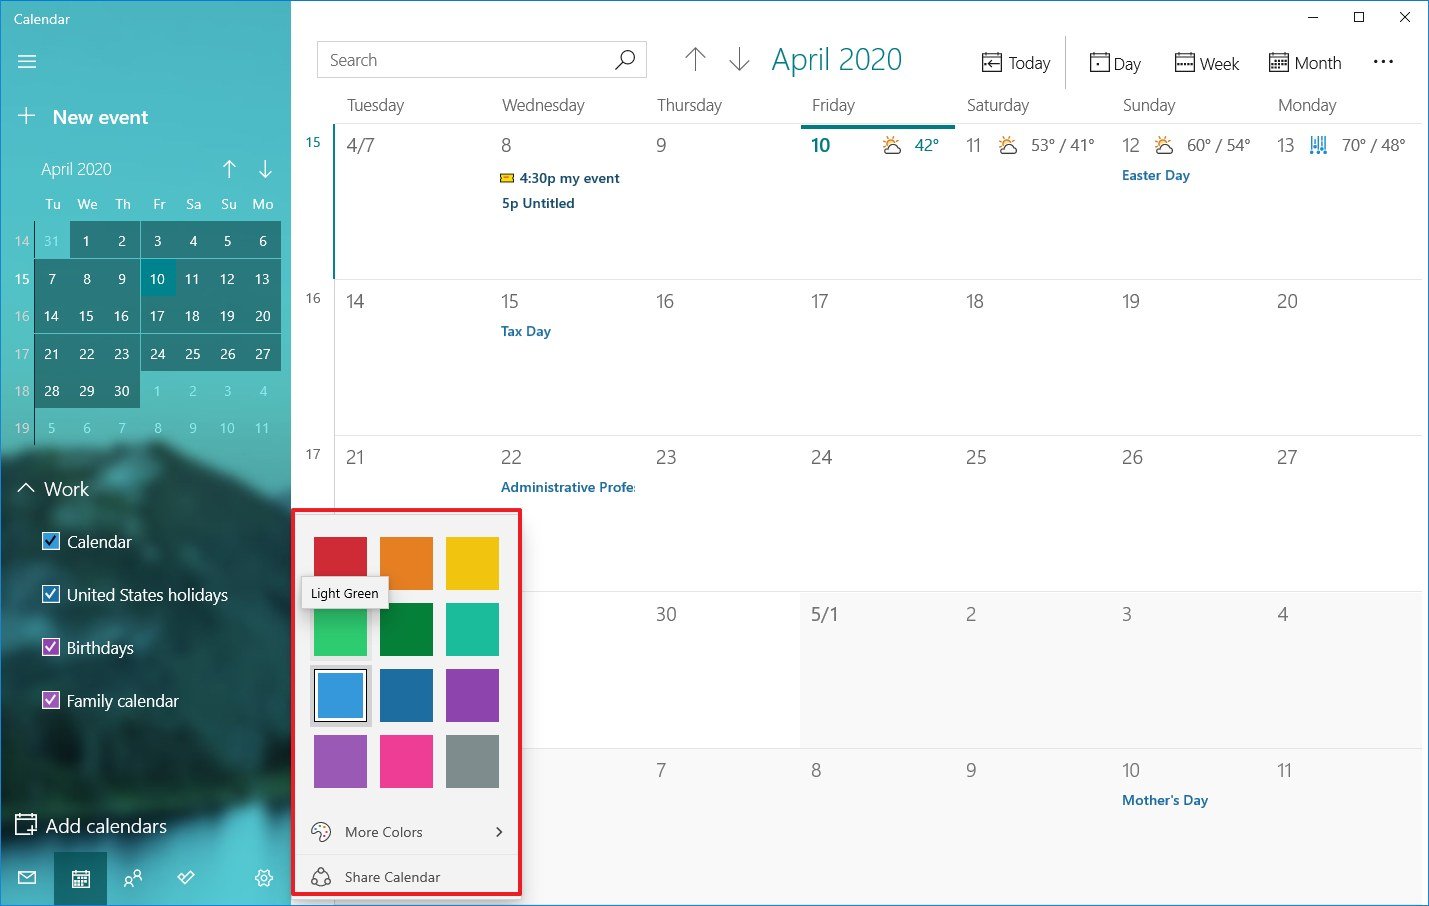
Customize calendar
To change the color and visibility of a calendar, use these steps:
- Open Calendar.
-
Under the desired account, right-click the calendar and select a new color.
-
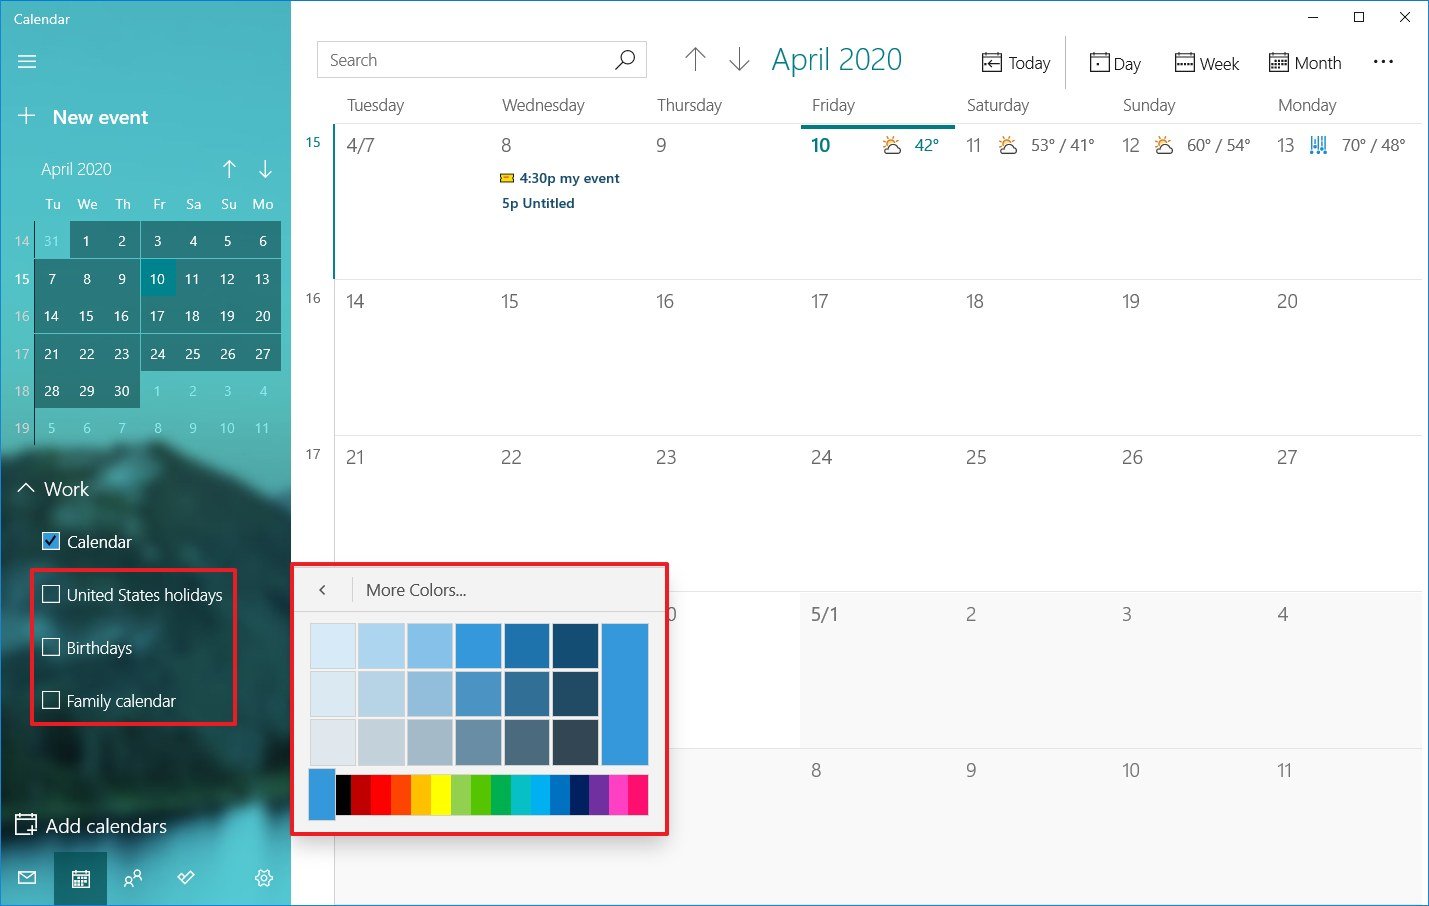
(Optional) Click the More colors option and create a new color.
- (Optional) Clear the checkbox if you don't want a calendar to appear in this app.
After you complete these steps, events in the calendar will appear using the color scheme that you selected.
Share calendar
To share a calendar with other people, use these steps:
- Open Calendar.
-
Under the desired account, right-click the calendar and select the Share calendar option.
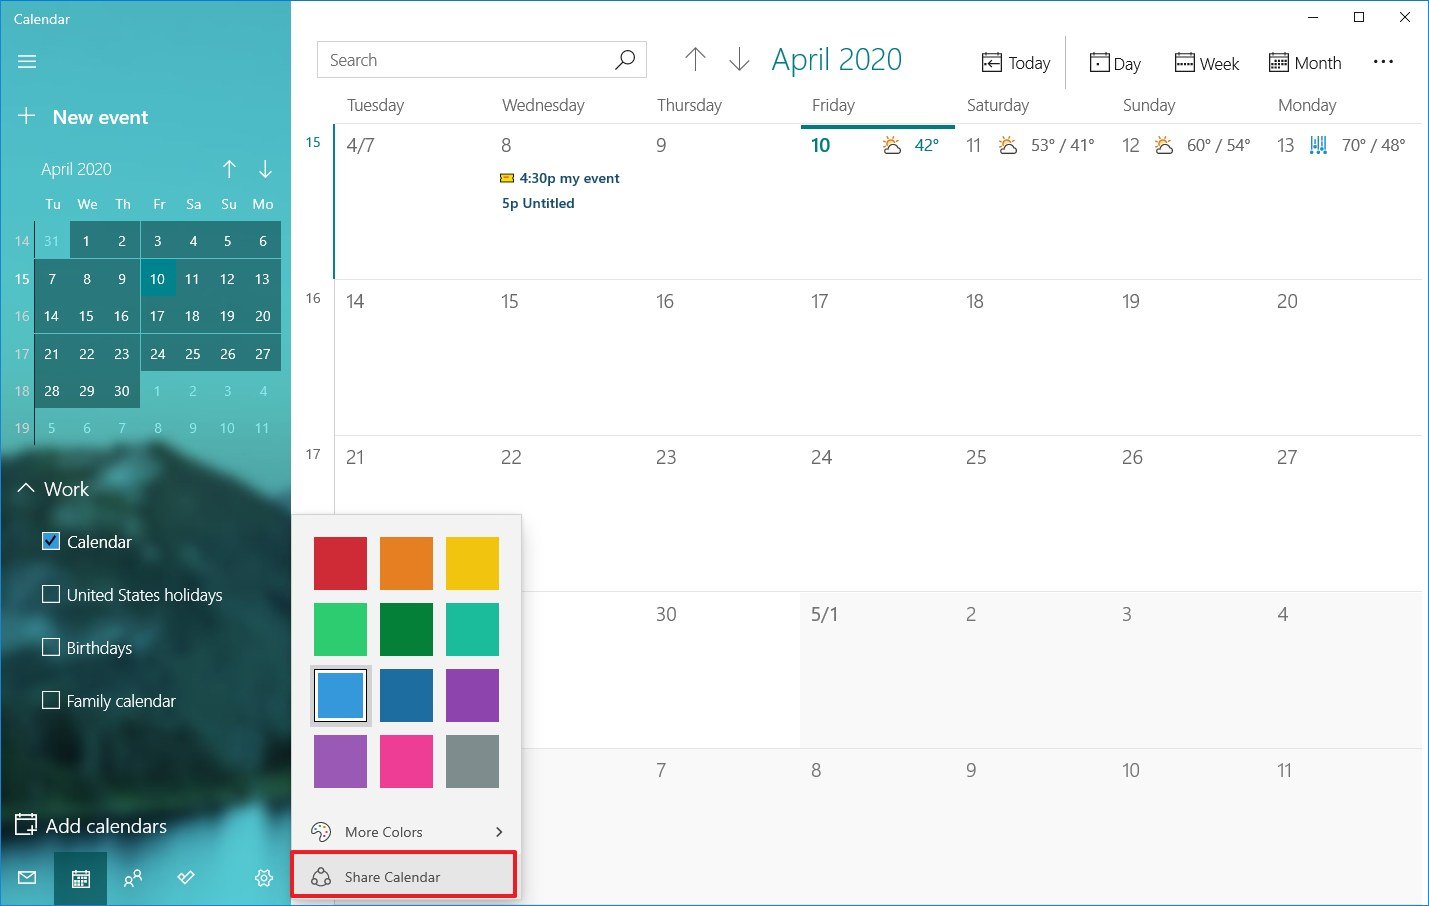
- Confirm the email address of the person you want to share the calendar with and press Enter.
-
Use the drop-down menu to decide if the person will have view or edit permissions.

- Click the Share button.
Once you complete the steps, the people you invited will have access to the calendar events.
If you want to stop sharing a calendar, simply click the trash button next to the calendar you're currently sharing from the "Share this calendar" page.
Change calendar views
The Calendar app is set to display the current month of events, but depending on your lifestyle and work schedule, you have different views that you can access using the toolbar at the top of the app.
For instance, you can change views to show a single day, week, month, or year. If you hover over the Day and Week options, you'll notice a drop-down menu to use the multi-day view or switch to view only your workweek.
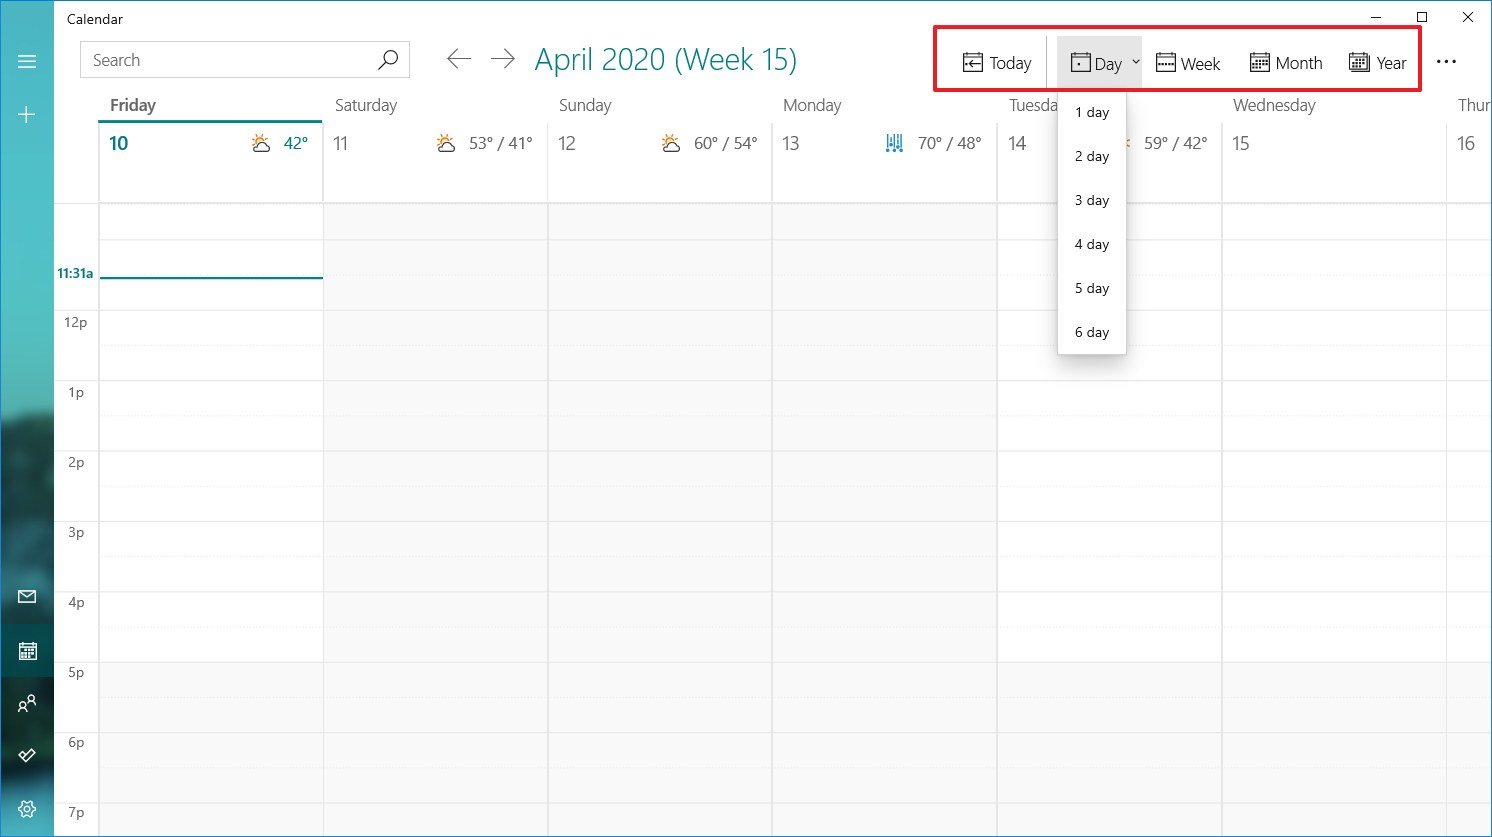
Although you won't likely use the Year option frequently, it's a good option that you can use to quickly jump to a specific day or month.

In addition, on the top left side, you'll find a search box that you can use to find events in your calendars, and the arrow buttons are handy to navigate days, weeks, months, or years depending on the current view.
Finally, if you ever find yourself lost in the app, you can click the Today button to jump right into the current day.
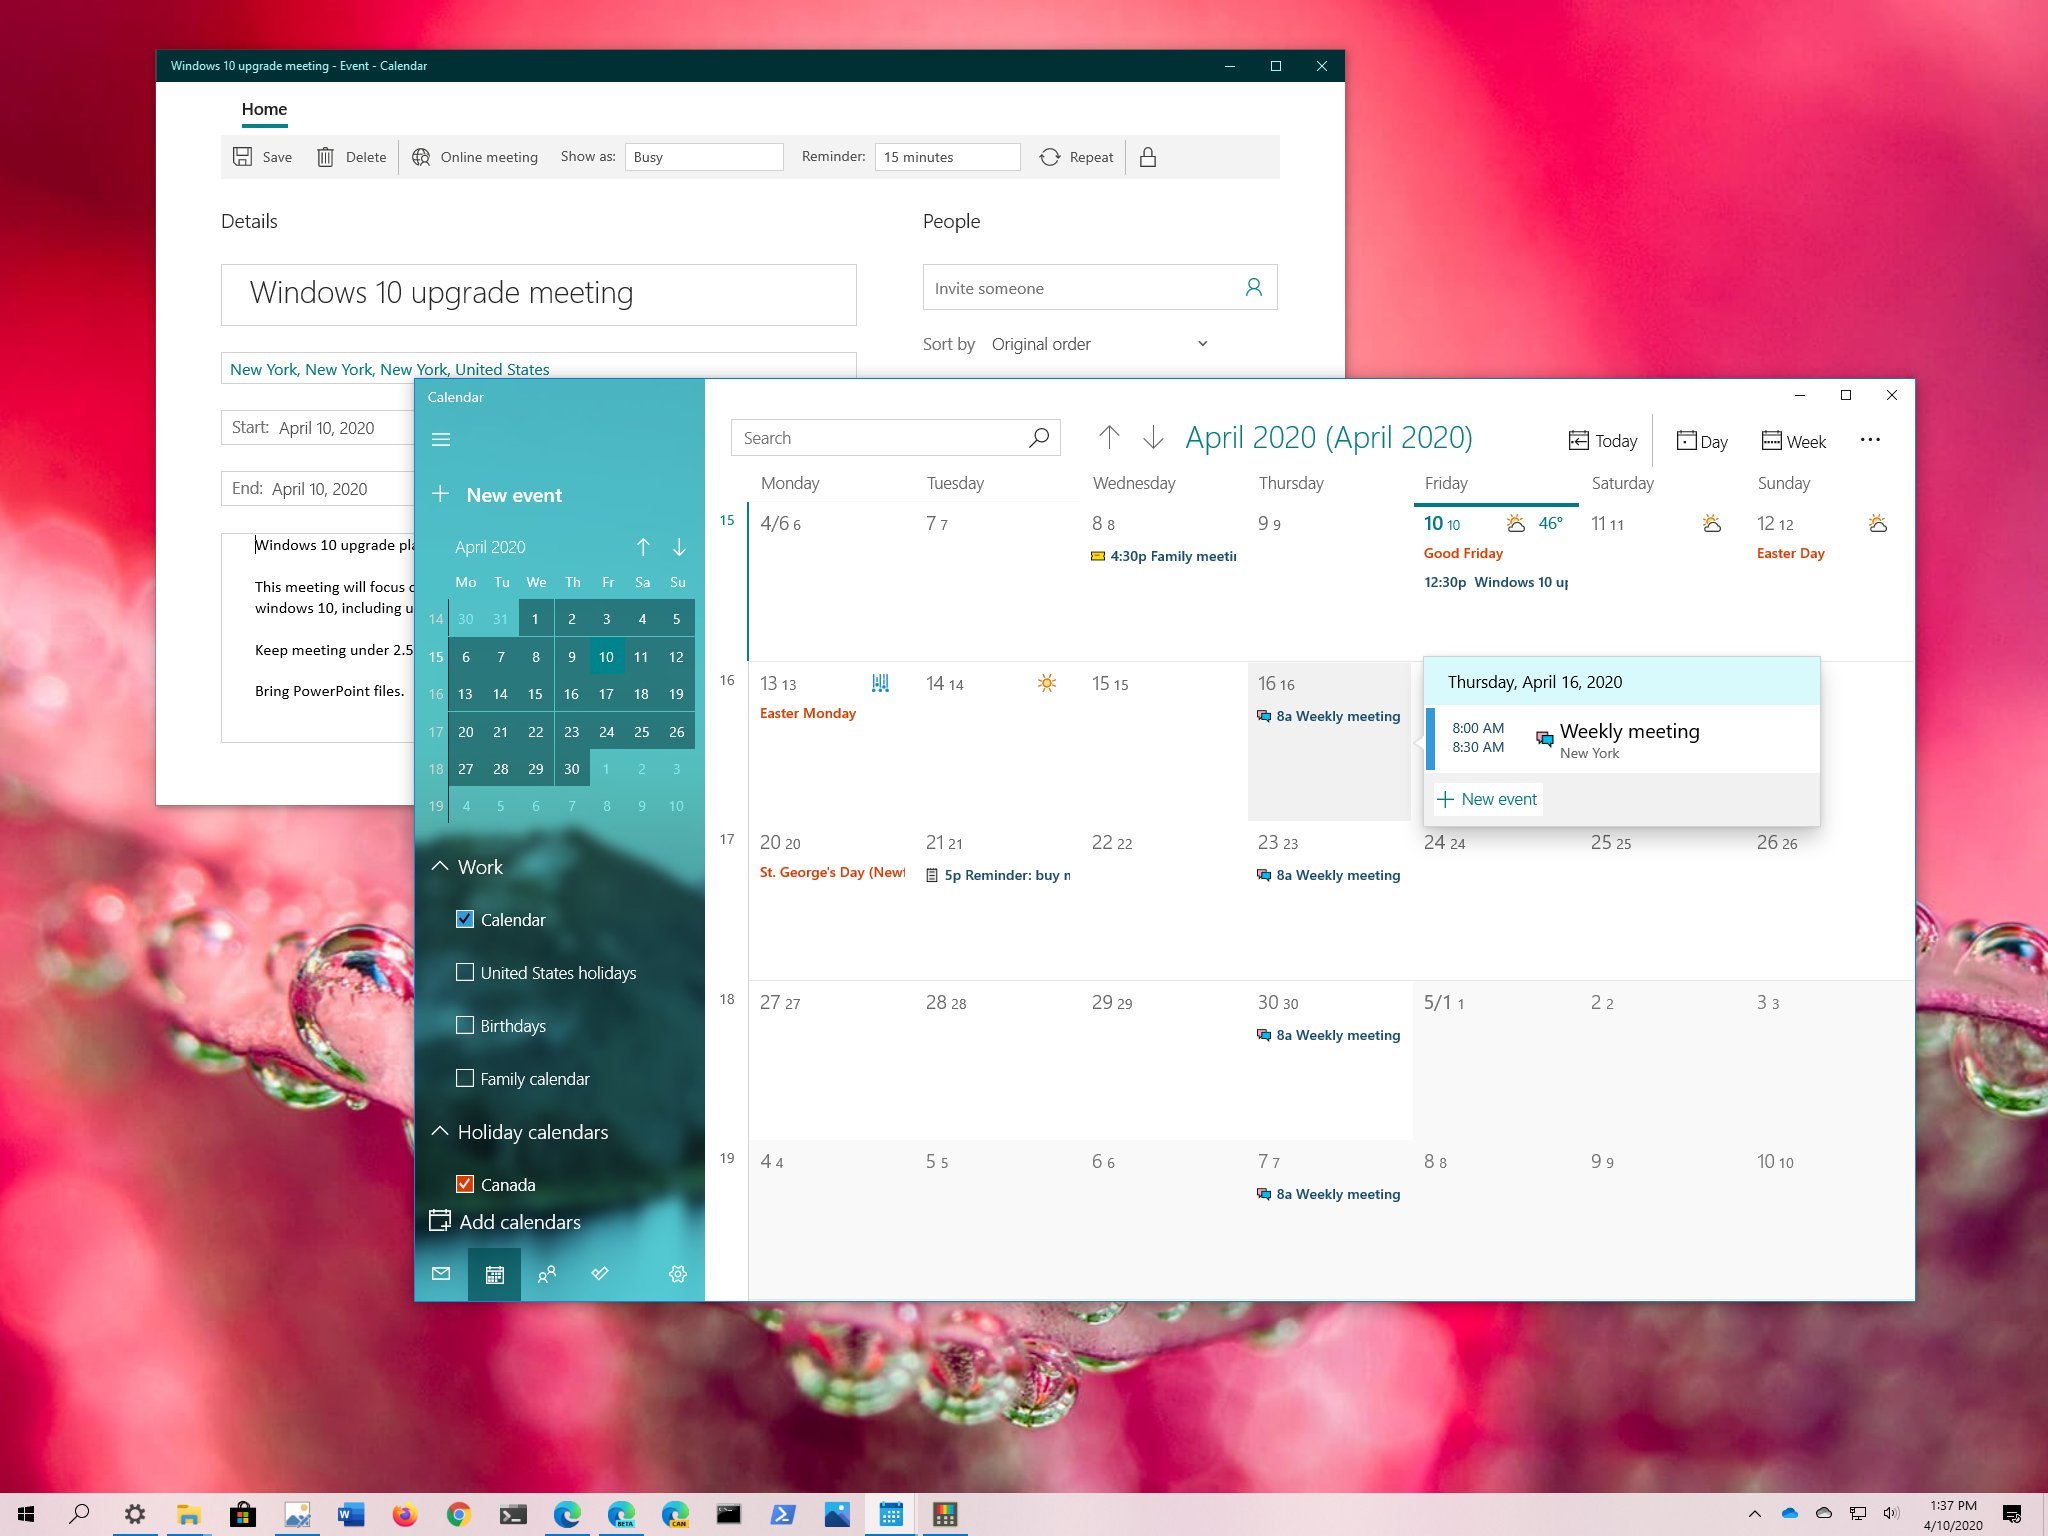
How to add calendar events on Calendar
There are at least two ways to add new events to a calendar. You can do this within the app or using the date-and-time flyout menu available through the taskbar.
Create a detailed event using the app
To create a new calendar event within the app, use these steps:
- Open Calendar.
-
Click the New event button in the top-left corner.
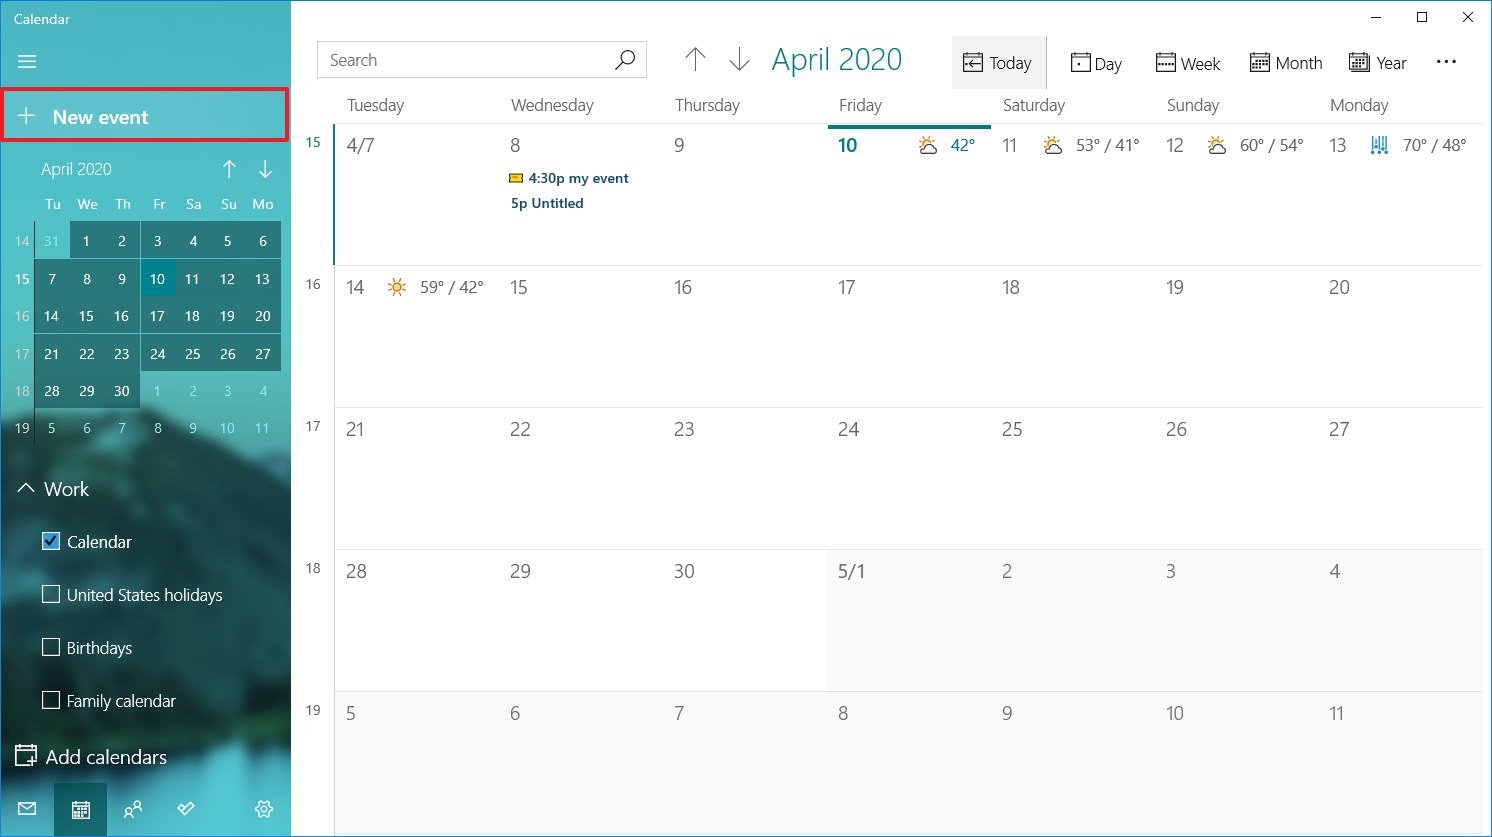
Quick tip: Within the app, you can also use the Ctrl + N keyboard shortcut to create a new event.
-
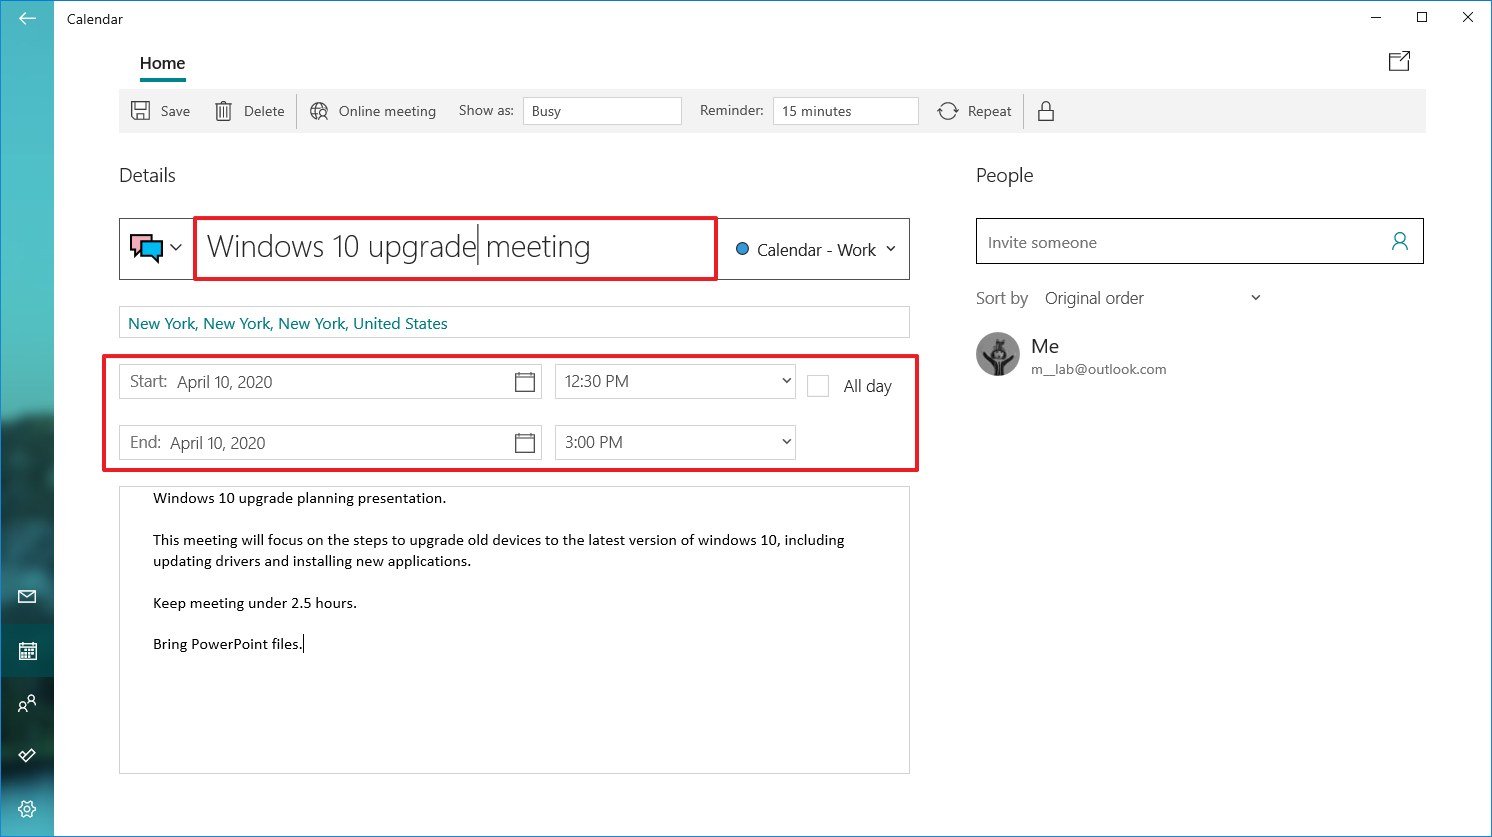
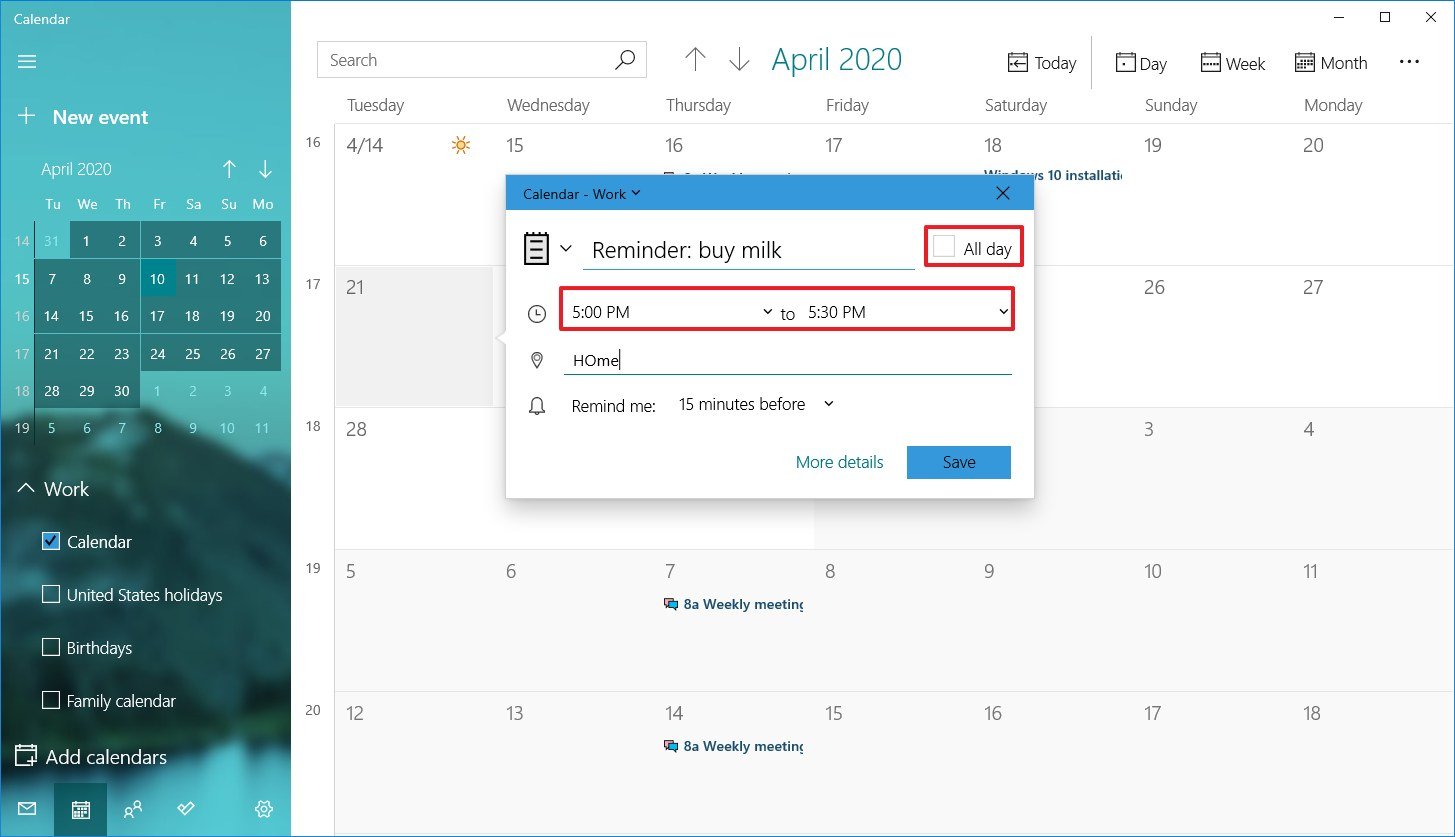
Under the "Details" section, specify a descriptive title for the event.
- (Optional) Click the drop-down menu on the left and select a related icon to make it even easier to find the event.
- (Optional) Use the Calendar drop-down menu and select the account to which you want to save the event.
- Specify the physical location where the event will take place.
- Use the Start option to specify a start date.
- Use the drop-down menu on the left to select a start time.
- Use the End option to specify the end date.
- Use the drop-down menu on the left to choose an end time.
- (Optional) Check the All day option if the event uses the entire day.
- In the bottom section, add all the details about the event.
-
(Optional) Use the Show as drop-down menu to select a visual cue, including:
- Free.
- Working elsewhere.
- Tentative.
- Busy.
- Out of office.
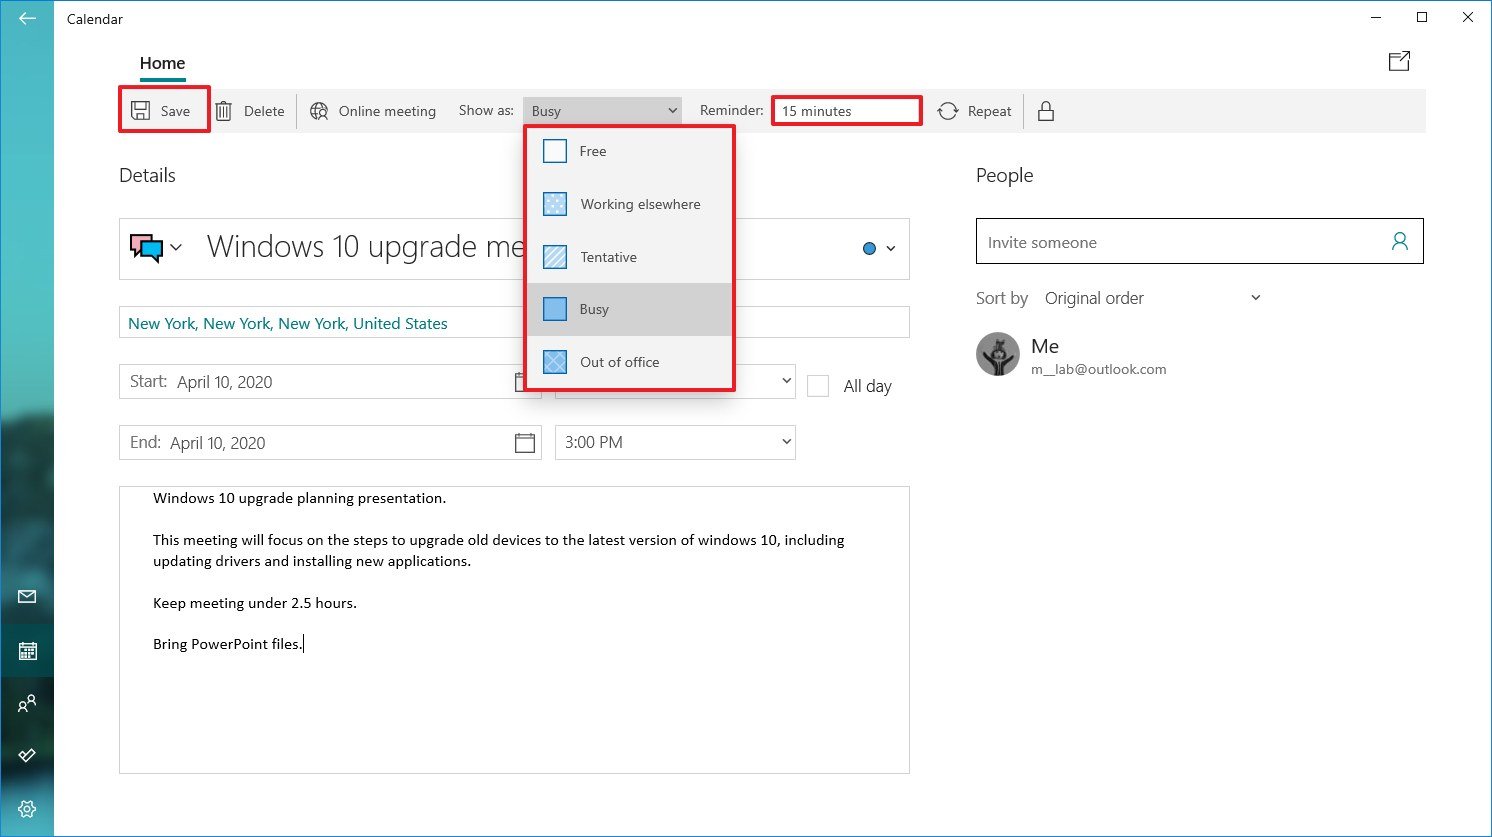
- Use the Reminder drop-down menu to select how long before you should receive an alert about the event. (You can use None to disable the option or select any time between 0 minutes to 1 week before the event.)
- Click the Save button in the top-left.
Once you complete the steps, the event will be saved in the account you specified.
You can use the steps below to schedule a repeating or group event using the Calendar app.
Create a repeating event using the app
To create a repeat calendar event, use these steps:
- Open Calendar.
- Click the New event button in the top-left corner.
- Click the Repeat button in top-right corner.
-
Under the "Repeat" section, use the Start option to specify the start date of the event.
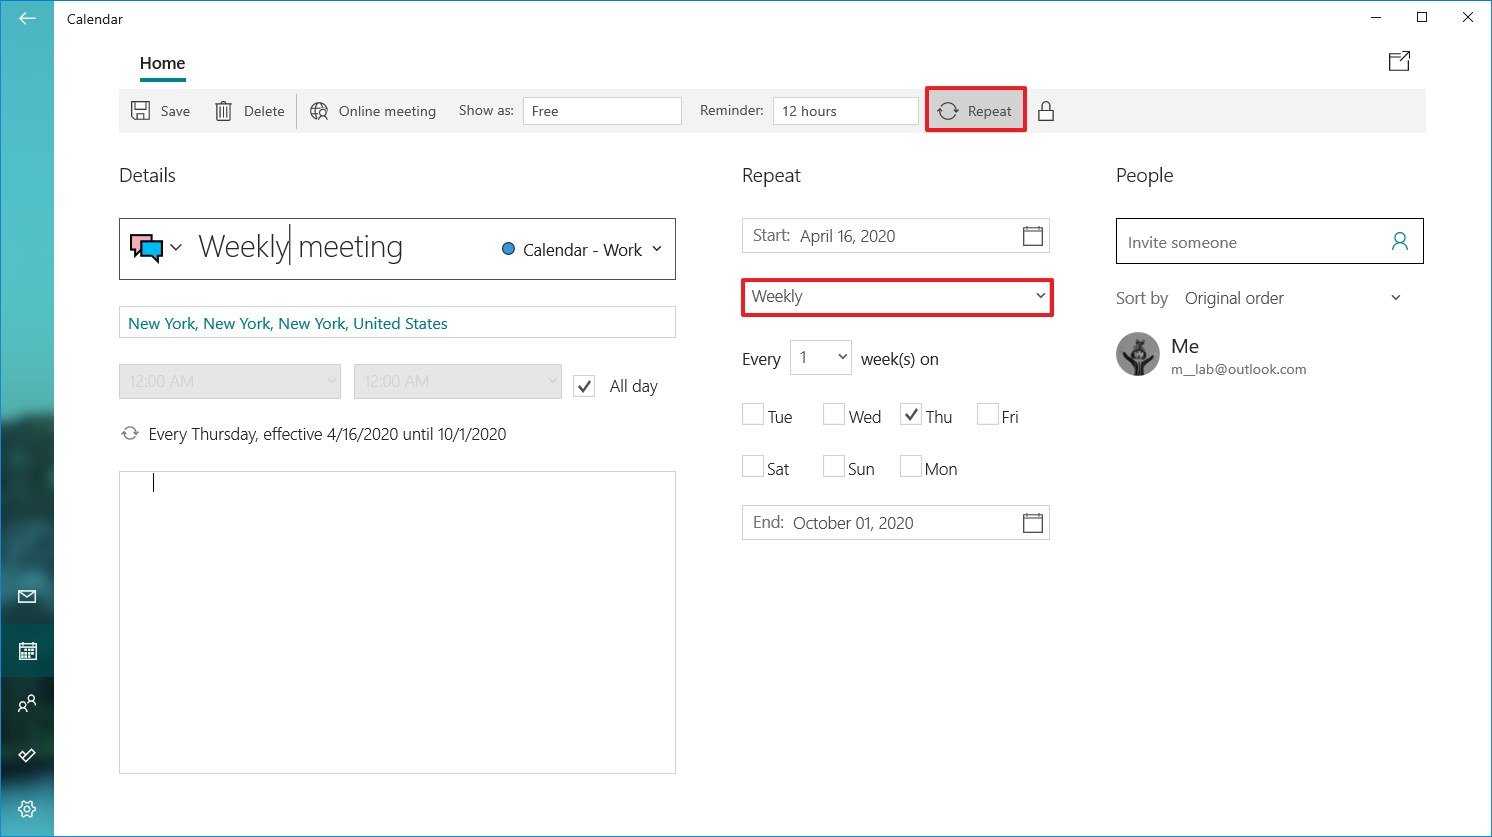
-
Use the date drop-down menu to select how to often to repeat the event, including:
- Daily.
- Weekly.
- Monthly.
- Yearly.
-
If you select the Weekly option, you'll also need to specify how many weeks the event should repeat and on what day of the week.
Quick tip: We're using "Weekly" as an example, but if you select another option the settings will be different.
- Use the End option to specify the date when the event should stop repeating.
- Under the "Details" section, specify a descriptive title for the event.
- (Optional) Use the Calendar drop-down menu and select the account you want to save the event.
- Specify the physical location where the event will take place.
-
Use the time drop-down menus to select the start and end times for the event.
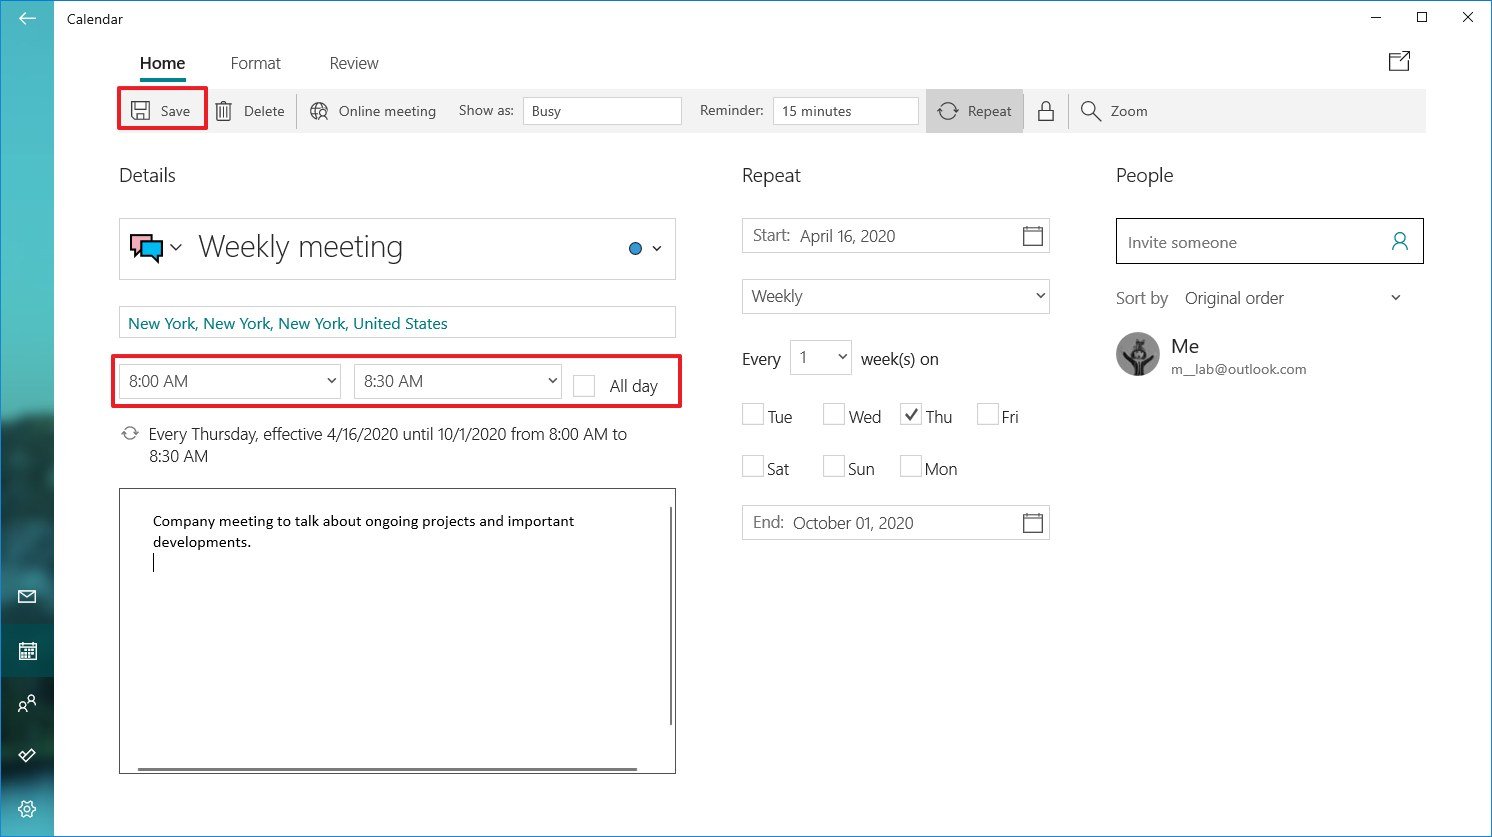
- In the bottom section, add all the details about the event.
- Use the Reminder drop-down menu to select how long before you should receive an alert about the event.
- Click the Save button in the top-left.
After you complete these steps, the event will keep repeating, depending on the schedule you specified.
Create a group event using app
If you need to schedule a meeting or organize an event, you can set up a calendar event and invite people no matter the email addresses they have.
To set up a group calendar event, use these steps:
- Open Calendar.
- Click the New event button in the top-left corner.
-
Under the "People" section, confirm the email address of the person you want to invite to the calendar event and press Enter.
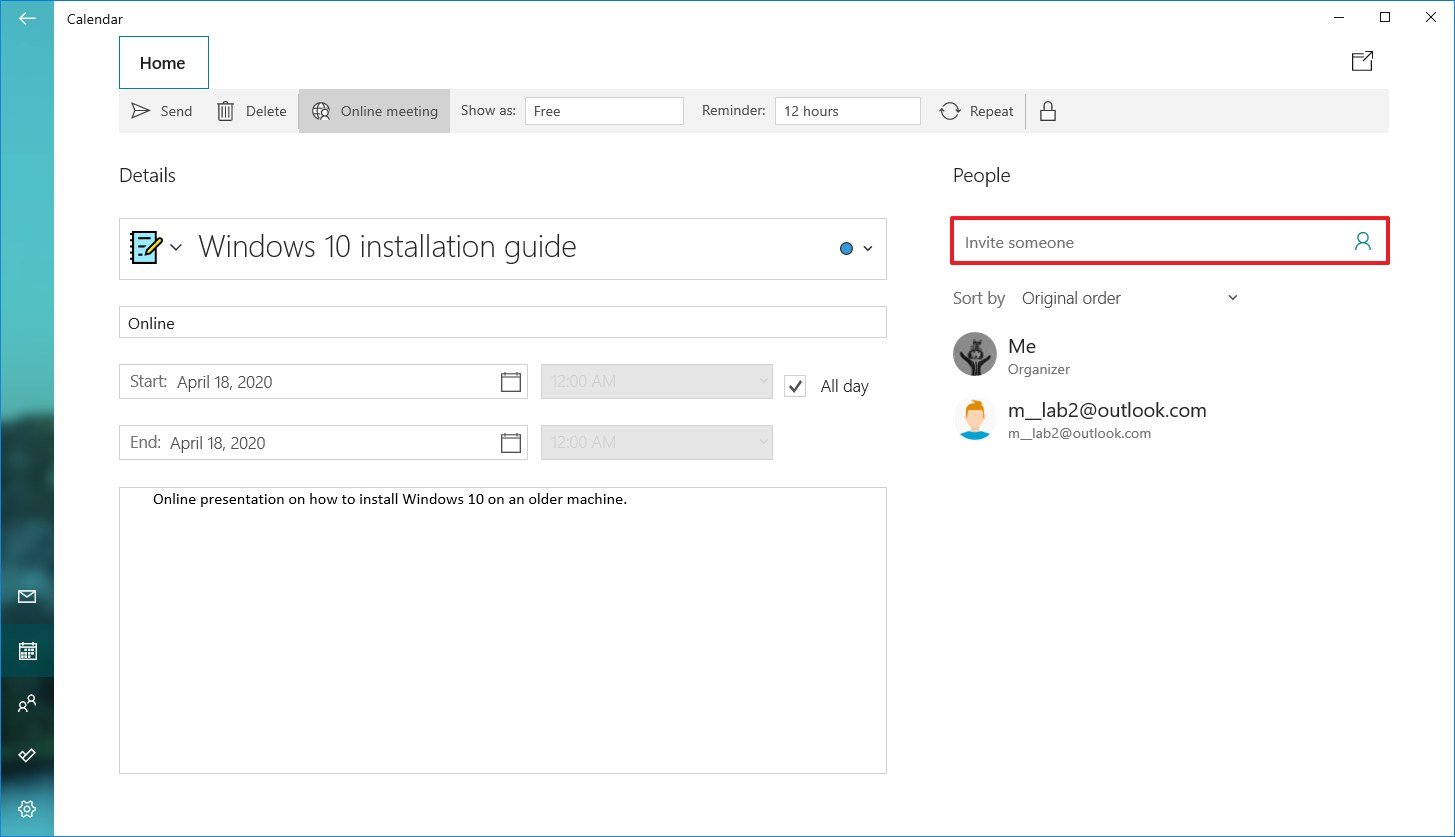
- Repeat step No. 3 to add more people to the event.
- Under the "Details" section, specify a descriptive title for the event.
- (Optional) Use the Calendar drop-down menu and select the account you want to save the event.
- Specify the physical location where the event will take place.
- Specify the start and end dates for the calendar event.
- Specify the start and end times for the event.
-
In the bottom section, add all the details about the event.
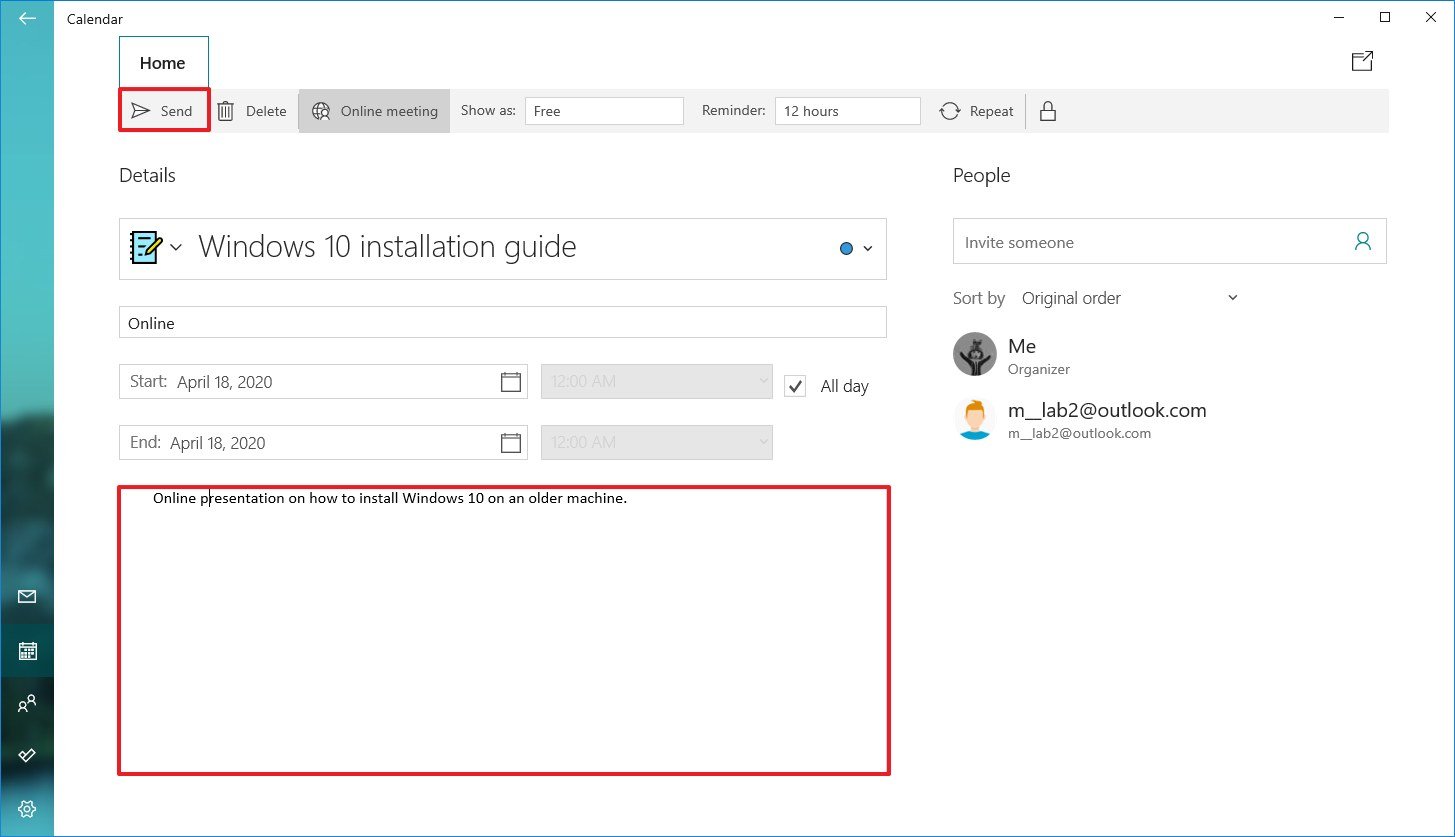
- Use the Reminder drop-down menu to select how long before you should receive an alert about the event.
- Click the Send button.
Once you complete these steps, the event will appear in your calendar, as well as in those of the people to which you sent the invitation. In addition, they'll also receive an email notification, which they can RSVP or decline.
Create a quick event using app
If you need to create a calendar event with minimal information, you don't need to go through many steps. To create a calendar event quickly, use these steps:
- Open Calendar.
- Click a date in the calendar to bring up event creator popup.
- Specify a descriptive title for the event.
-
Clear the All day option.
- Select a start and end time
- (Optional) Specify the physical location where the event will take place.
- Use the "Remind me" drop-down menu to select how long before you should receive an alert about the event.
- Click the Save button.
After you complete the steps, the new event will appear in the calendar you specified. You can always select the day, and clicking the event will open a page to edit, cancel, or delete the event.
Create an event using taskbar
To create a calendar event or reminder from the taskbar, use these steps:
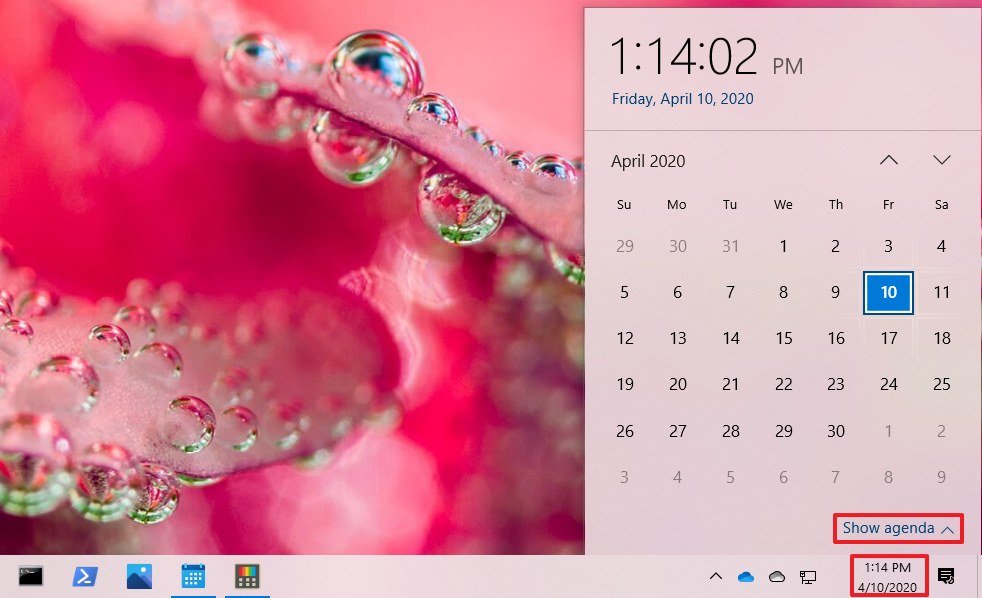
- Click the time and date button in the taskbar.
- Select the date to schedule the new event from the calendar.
-
Click the Show agenda option in the bottom-right corner.
- Under the "Today" section, start typing the event or reminder in the text box.
- Click the drop-down menu on the right to select the calendar to save the new event.
-
Specify the start and end time of the event.
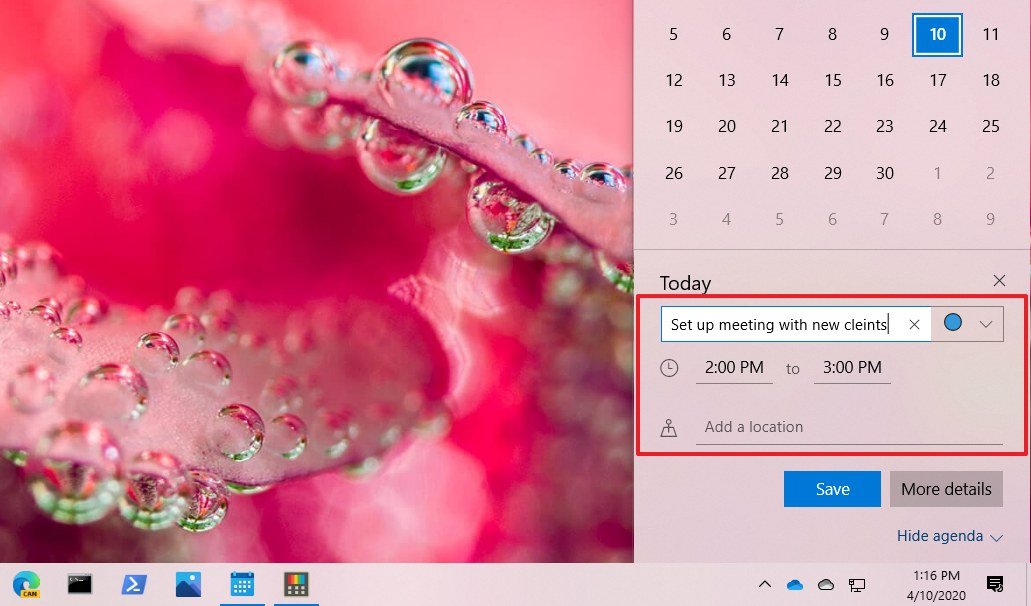
- Specify the location (if applicable).
- (Optional) Click the More details button to open the event using the Calendar app, which allows you to access more options and continue composing the event on a bigger canvas.
- Click the Save button.
Once you complete the steps, the event or reminder will be added to your calendar. If you want to check upcoming events or reminders for a specific day, you can do this by selecting the day from the schedule inside the time and date flyout, or by using the Calendar app.
How to add popular calendars on Calendar
The app also allows you to add a bunch of popular calendars to your work or personal calendar to make sure appointments will not conflict with certain holidays, sports games, or TV shows, which you can also use as reminders.
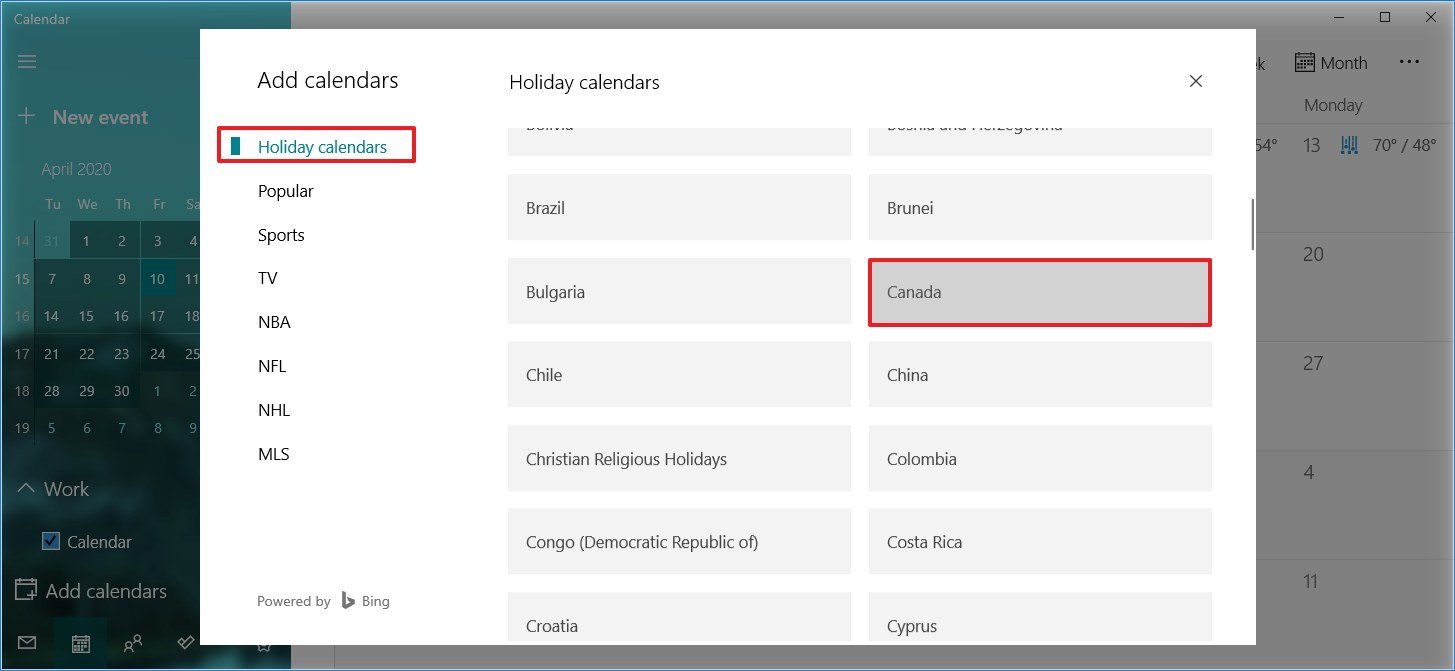
To add popular calendars to the Calendar app, use these steps:
- Open Calendar.
-
Click the Add calendars button in the bottom-left corner.
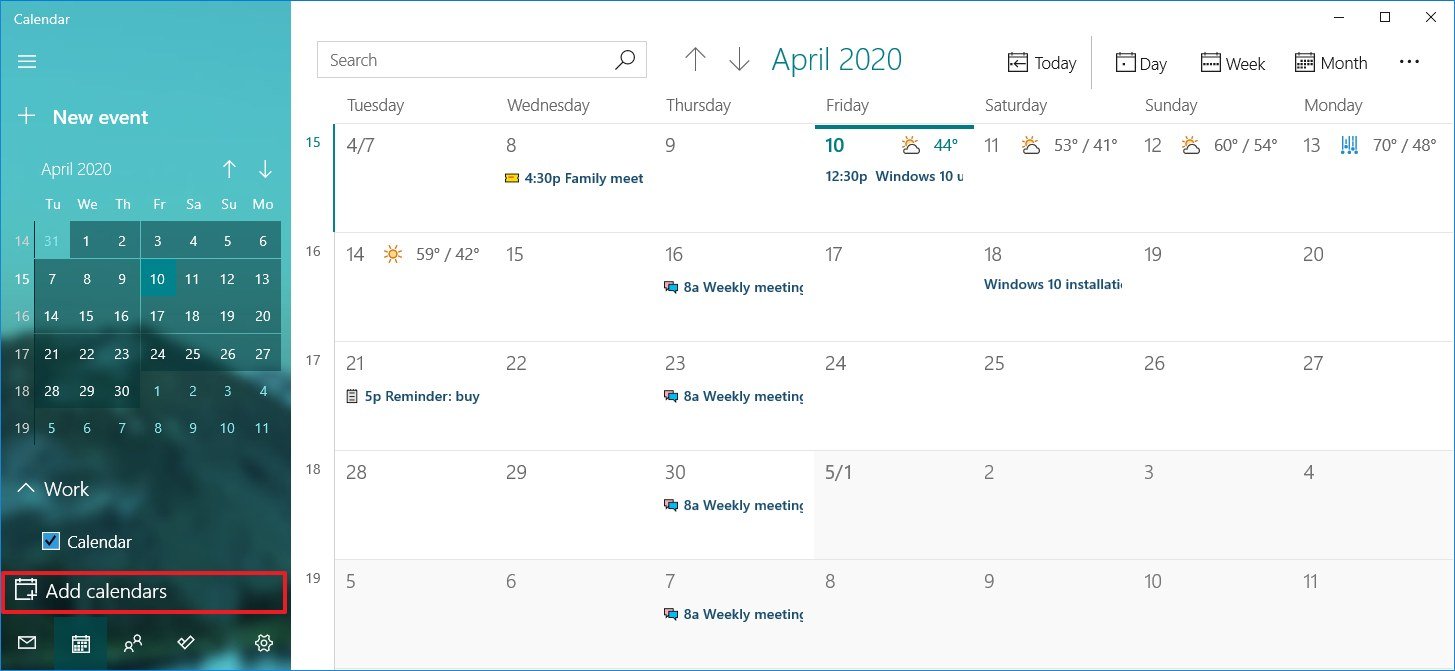
- Select the calendar category. For example, Holiday calendars, Popular, Sports, or TV.
-
If you selected the Holiday calendars category, you need to select your region's calendar to add it.
- If you selected the TV category, choose the time zone, channel, and show you want to add to the calendar.
- If you selected the Sports category, choose the sport, tournament, and the team schedule you want to add to the calendar.
After you complete these steps, the events should populate in your calendar.
How to sync events on Calendar
If you added a new event from your account using the web version of the service or on another computer, and it does not appear in your calendar, you may need to sync the settings manually.
To sync events to the Calendar app, use these steps:
- Open Calendar.
- Click the menu (three-dotted) button in the top-right side.
-
Click the Sync option.
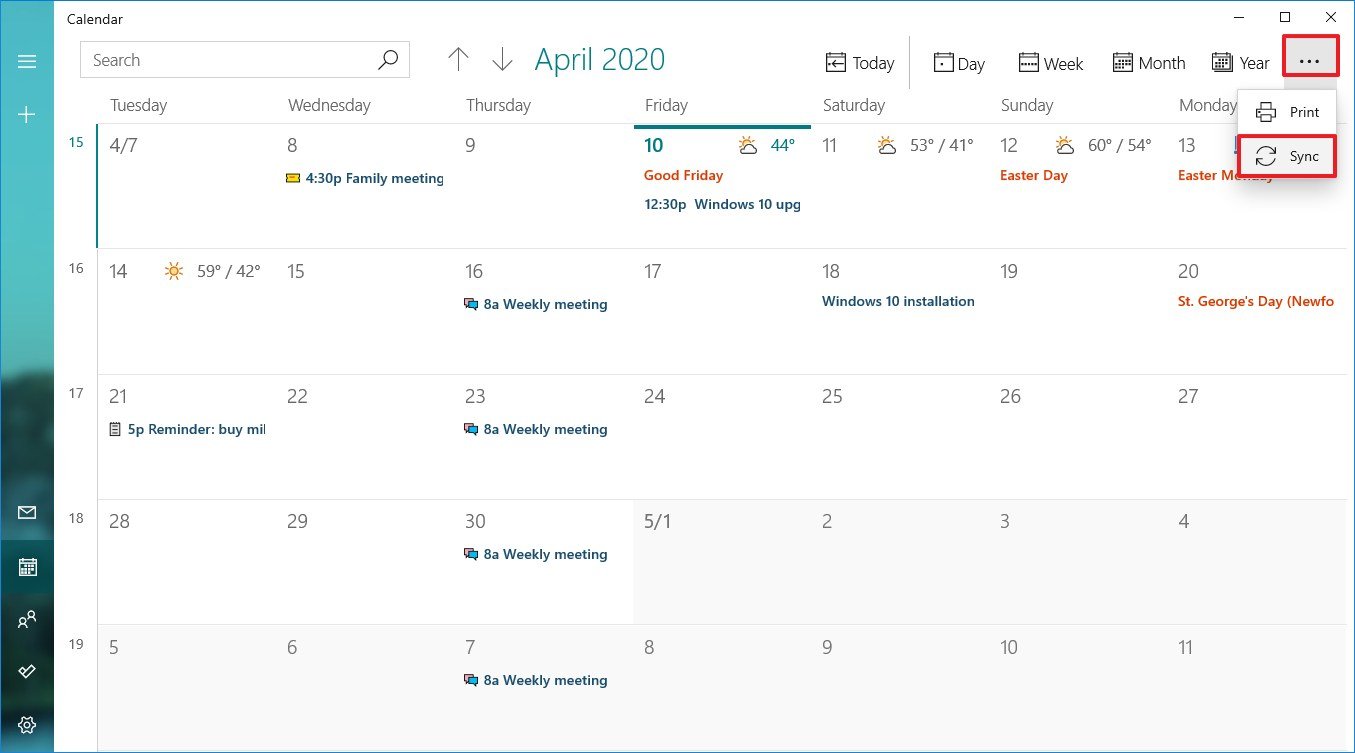
Once you complete the steps, the events should sync to and from the cloud, and they should synchronize across devices.
How to personalize your experience on Calendar
If you work from home, or you spend a lot of time setting reminders and scheduling events, the same look and feel can get boring quickly. However, you can customize the Calendar app to make it more personal by changing the color scheme, using a dark mode, and even selecting a custom background image.
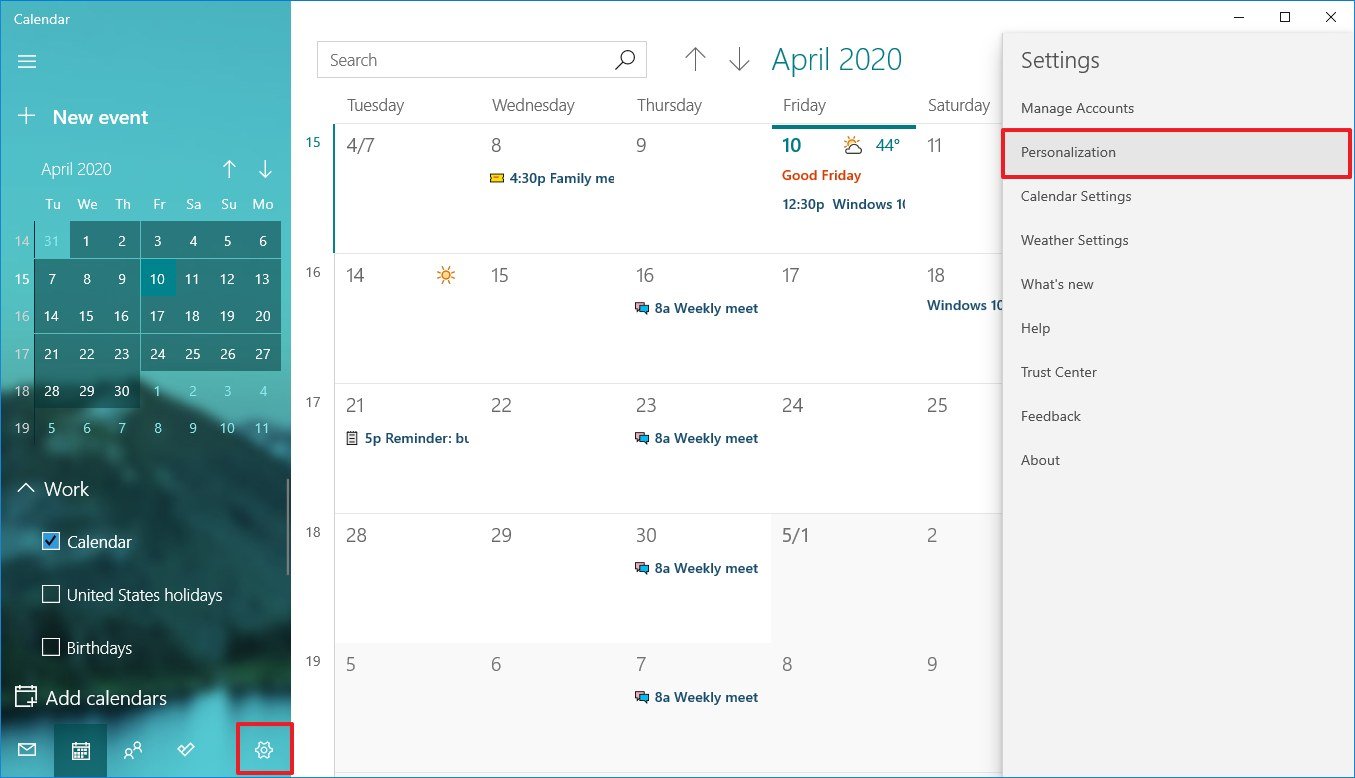
To customize the Calendar app, use these steps:
- Open Calendar.
- Click the Settings (gear) button in the bottom-left side.
-
Click on Personalization.
- Under the "Colors" section, select the color scheme you want to use.
-
Select the between the Light or Dark mode, or select the Use my Windows mode option.
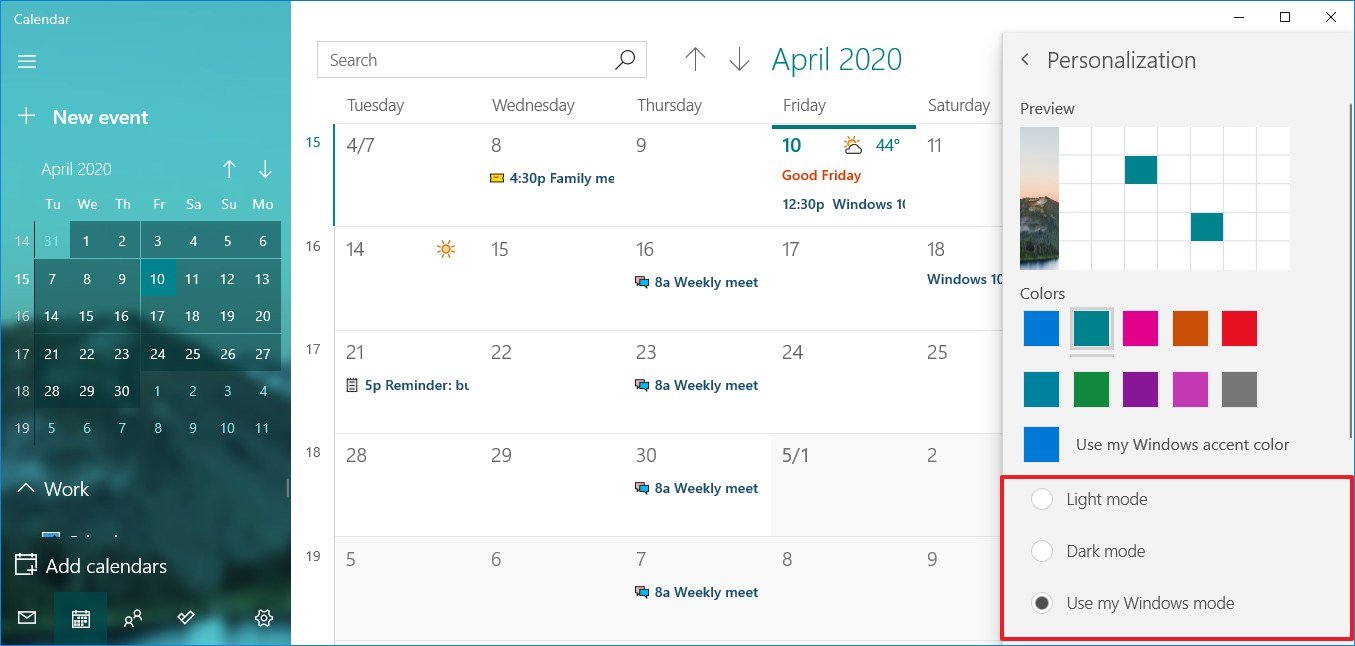
-
Under the "Background" section, select a background for the app.
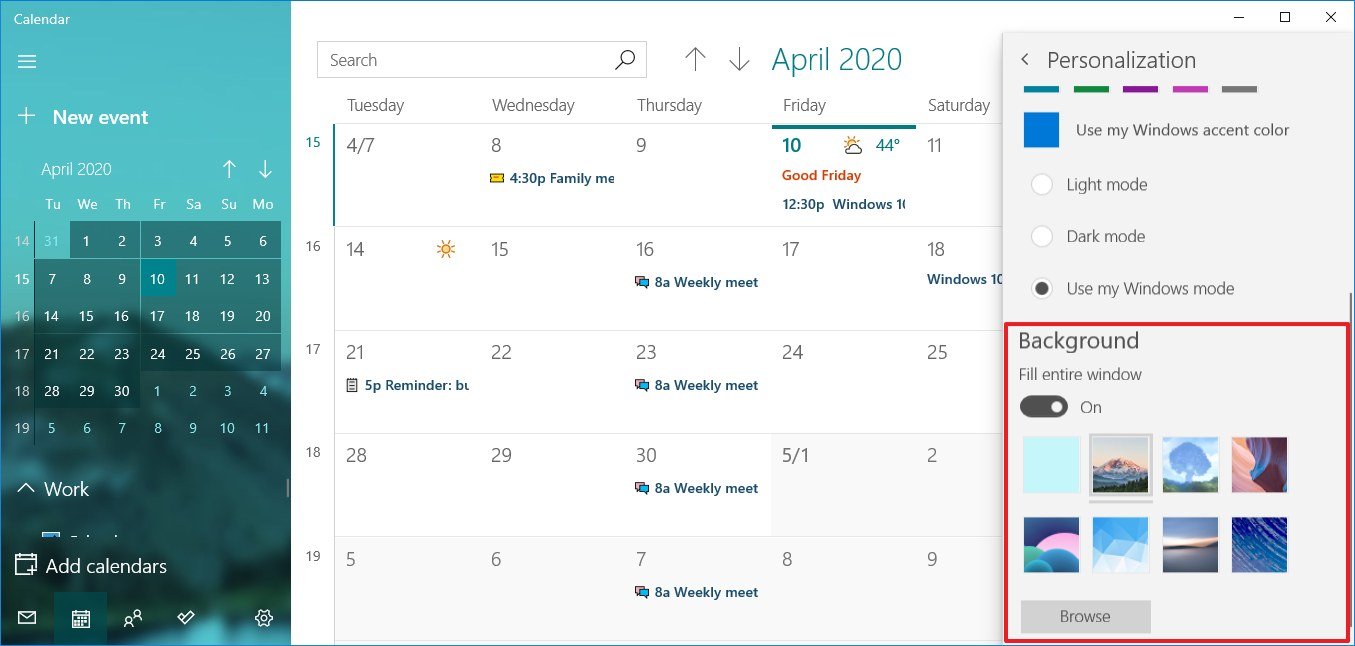
- (Optional) Click the Browse button.
- Select a custom image.
- Click the Open button.
After completing the steps, the Calendar app should be a little more pleasant to use.
How to change settings on Calendar
In the Calendar app, you can also customize various parameters to adjust the experience. For instance, you can set which day should be the first day of the week, what days of the week you go to work, working hours and more.
To customize the Calendar settings, use these steps:
- Open Calendar.
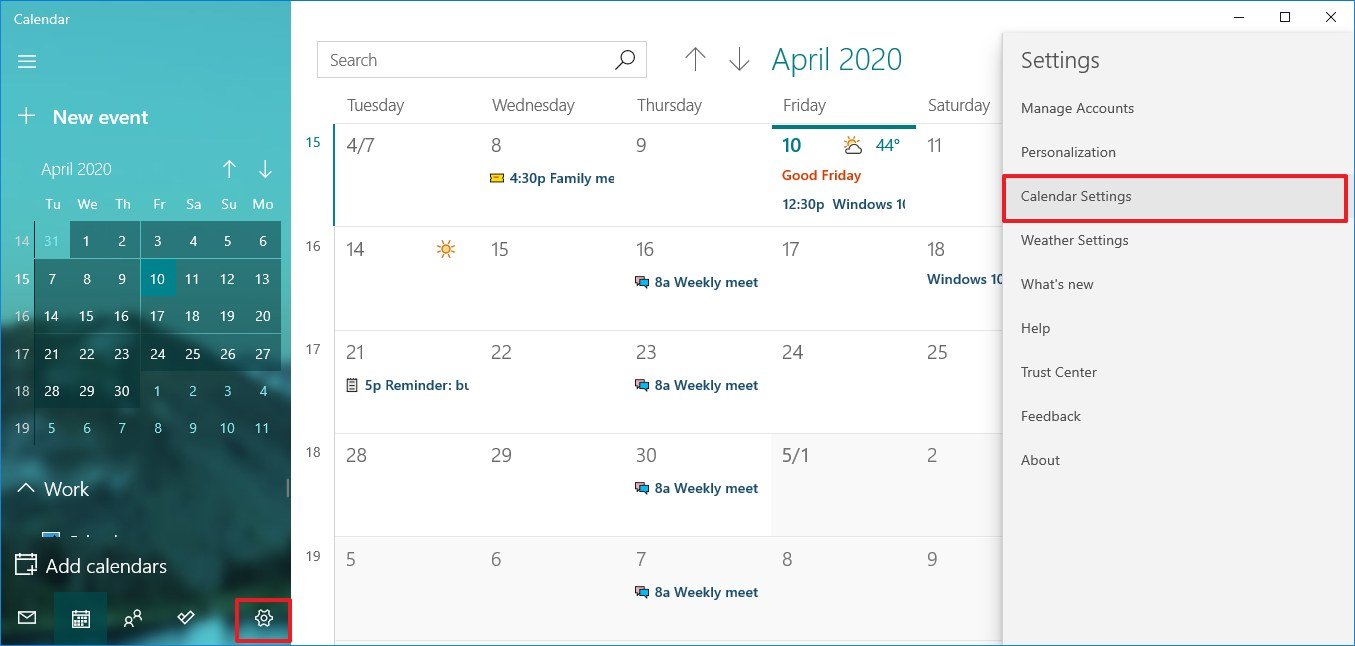
- Click the Settings (gear) button in the bottom-left side.
-
Click on Calendar Settings.
-
Under the "Week" section, use the drop-down menu to select your first day of the week.
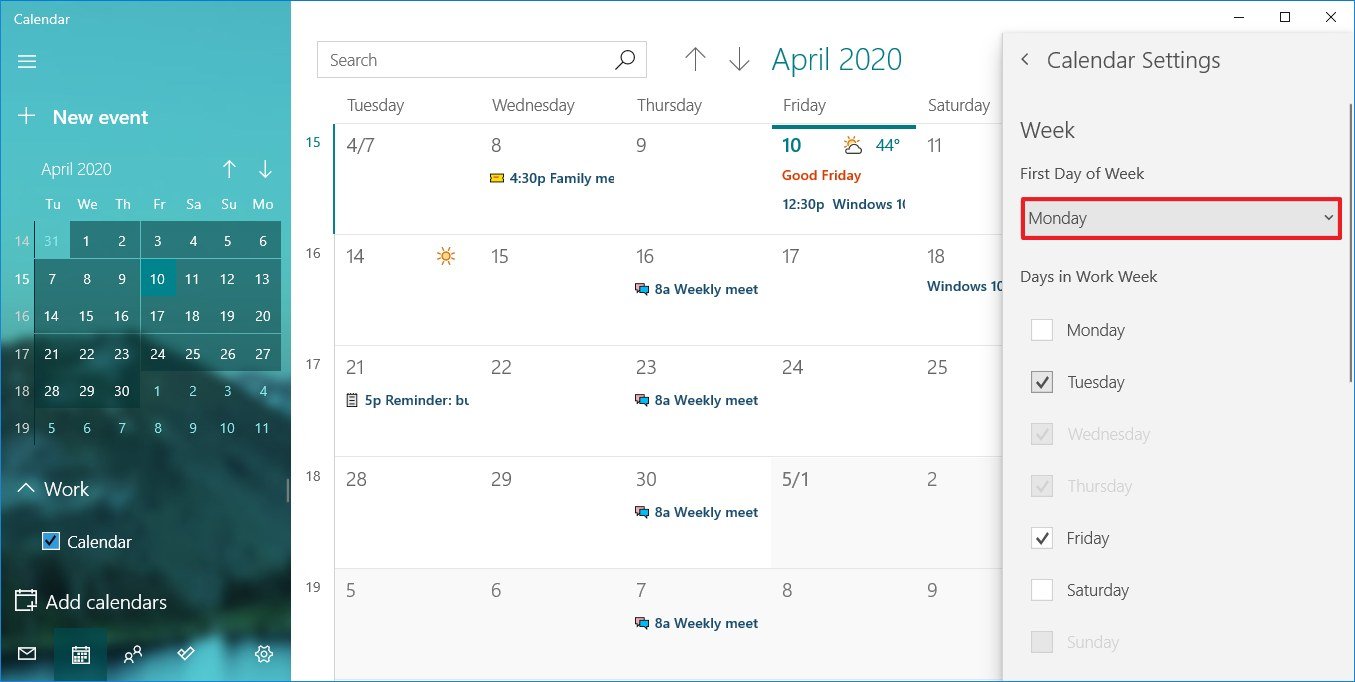
- (Optional) Use the Days in Work Week option to select the days in your workweek.
-
Under the "Working hours" section, specify the start and end of your working hours.
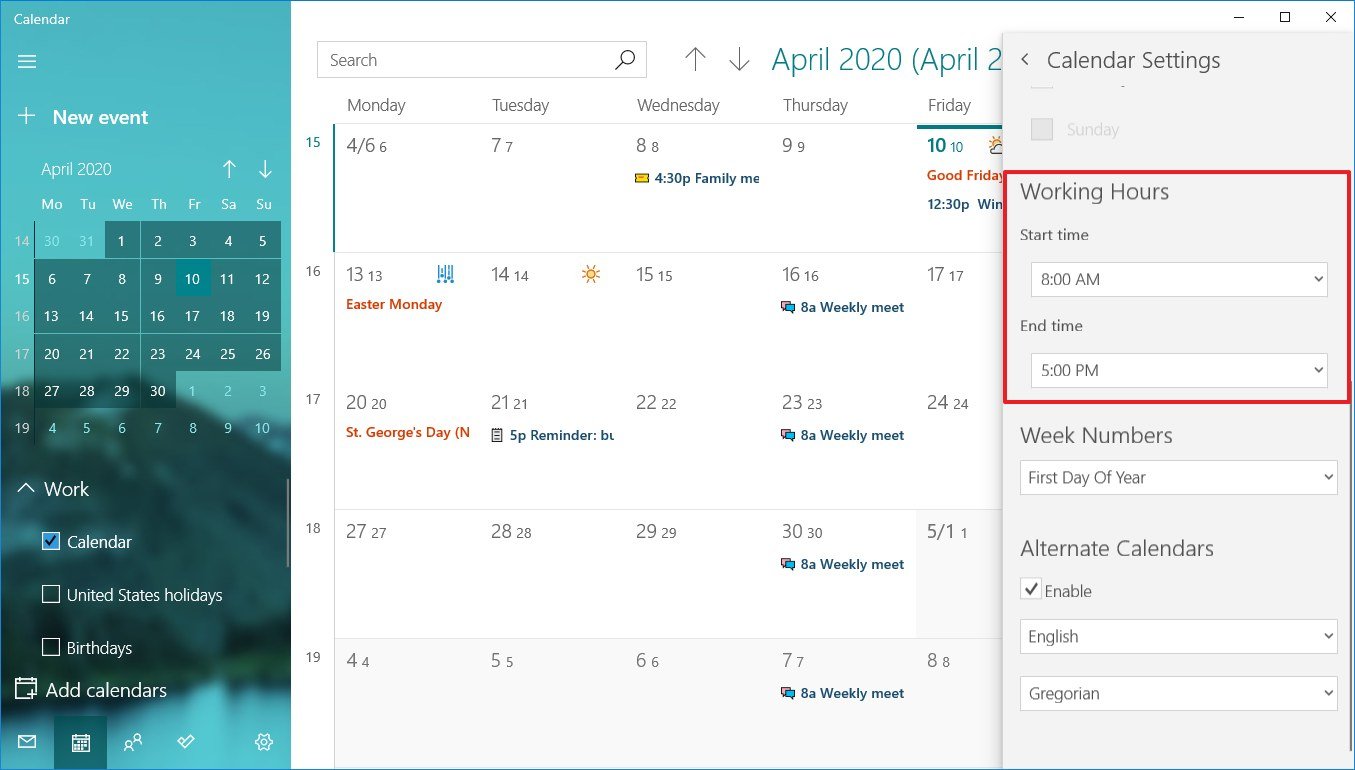
-
(Optional) Under the "Week Numbers" section, select how you want to show the week numbers in the calendar, including:
- Off.
- First Day of Year.
- First Full Week.
- First Four-Day Week.
Quick note: When you enable this option, the week numbers will appear on the left side.
- (Optional) Under the "Alternate Calendars" section, check the Enable option.
-
Select the alternate calendar, including:
- English.
- Japanese.
- Chinese.
- Arabic.
- Persian.
- Thai.
- Korean.
- Hebrew.
- Hindi.
-
Select the calendar type. For example, for English, options include:
- Gregorian.
- Hijri
- Umm al-Qura.
- Hebrew Lunar.
- Saka Era.
Once you complete the steps, the Calendar app will be customized to suit your preferences.
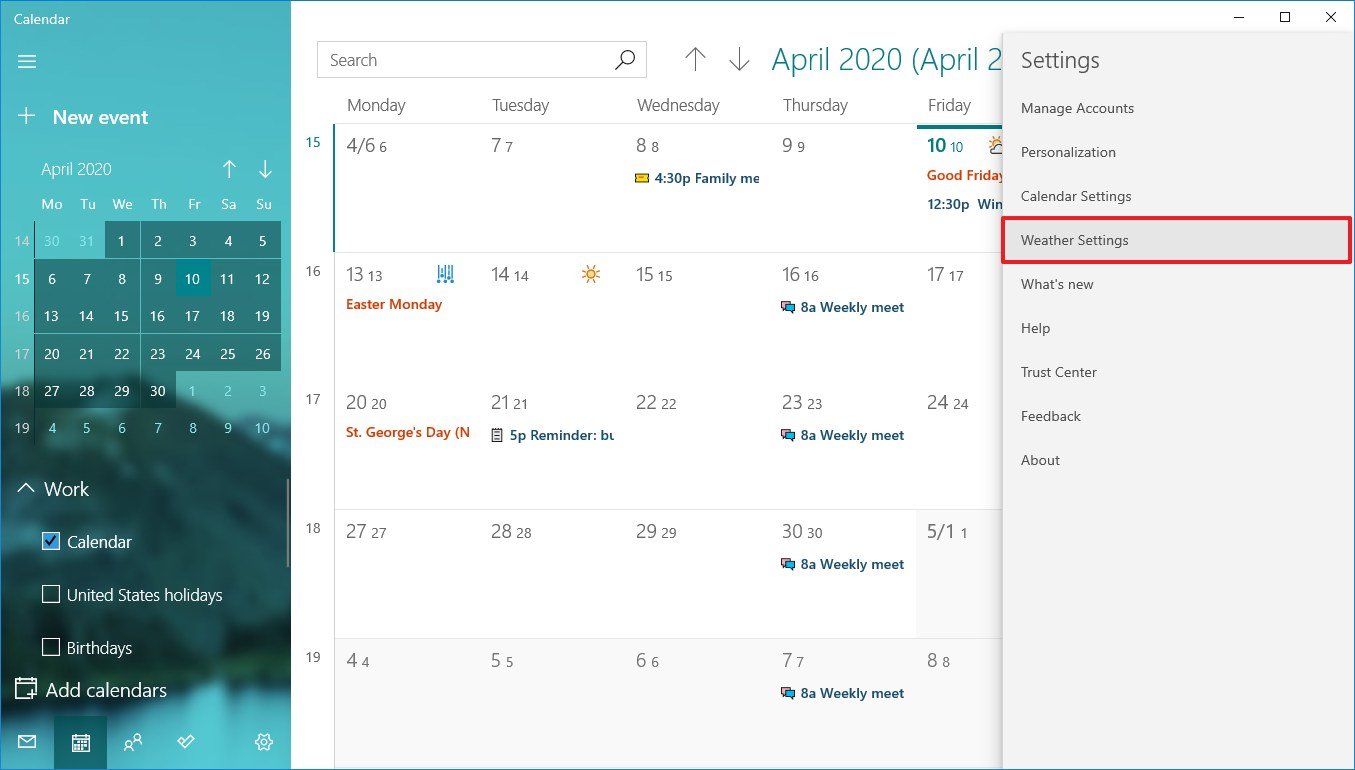
How to change weather settings on Calendar
The Calendar app also shows the weather forecast in the calendars to make it easier to plan events. If you feel more comfortable using a different scale unit for temperature, the app allows you to change the weather settings to use Celsius or Fahrenheit.
To change the weather settings on Calendar, use these steps:
- Open Calendar.
- Click the Settings (gear) button in the bottom-left side.
-
Click on Weather Settings.
-
Use the "Temperature Scale" drop-down menu and select between Celsius or Fahrenheit.
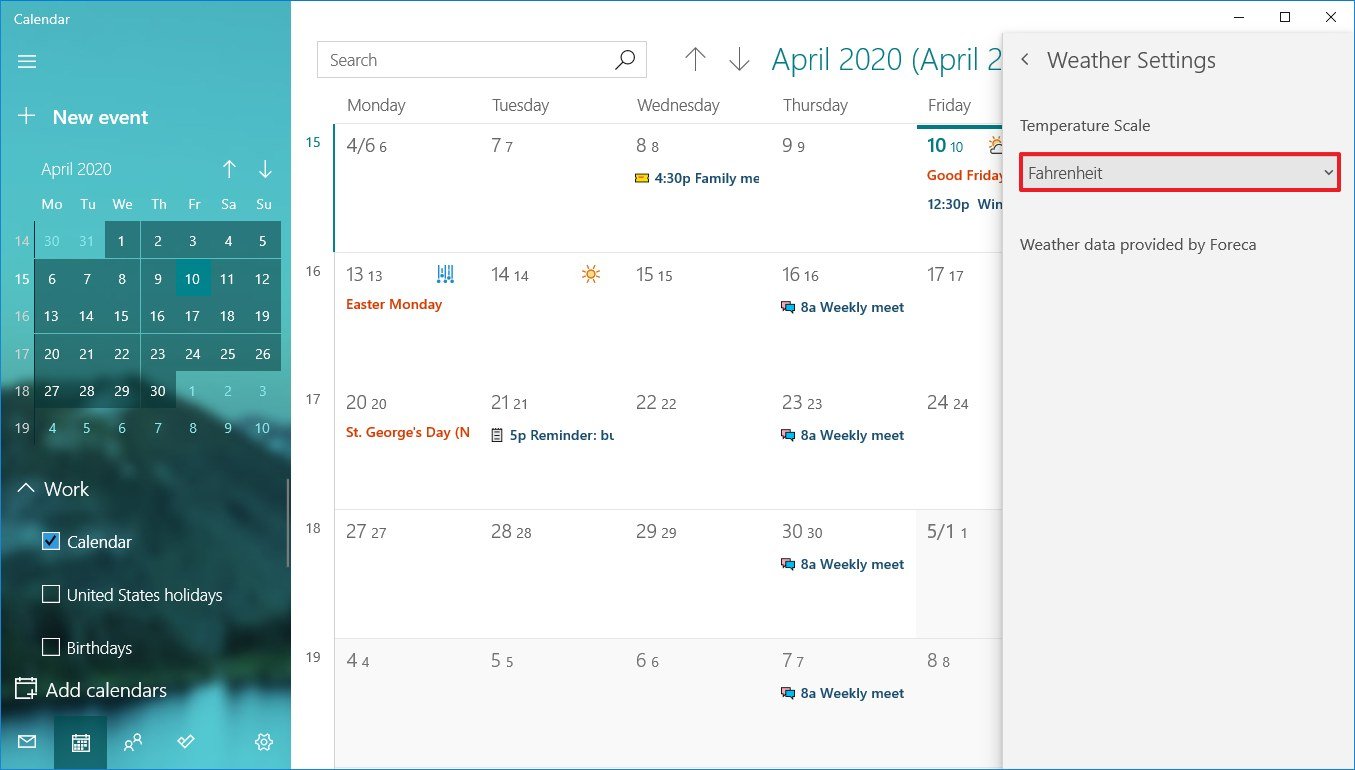
After you complete the steps, the weather will appear with the temperature scale that you specified.
If you're working from home, in addition to using the Calendar app, you can stay even more productive using an Office 365 (Microsoft 365) subscription, which gives you access to the most popular office applications, including Word, Excel, PowerPoint, Outlook, and much more. Also, using a subscription you'll receive features at no extra cost, and you'll get many other benefits, such as sharing the apps with other users and 1TB of OneDrive storage.
Office 365
Get subscribed
![]()
From $70 at Microsoft
Office 365 gives you full access to many apps and perks, such as 1TB OneDrive storage and Skype minutes. You can also install Word, Excel, PowerPoint, Outlook, and other apps on up to five devices, and depending on the subscription, you can share the account with up to five people.
More Windows 10 resources
For more helpful articles, coverage, and answers to common questions about Windows 10, visit the following resources:
Source: https://ift.tt/3eeaaIR