![]()
The Pixel 6 can be the most personal Android ever — once you fully set it up!
The Google Pixel 6 may only be a month old, but Verizon and AT&T were practically giving them away during the Black Friday/Cyber Monday weekend. If you got the best Android phone on the market for free last week, congrats! (If you haven't, those deals are still active right now, so go trade up to greatness.
With wonderful features, insanely-fast AI thanks to the Google Tensor processor, and a flashy new design to show off its upgraded camera array, Google has worked hard to make it more personal, colorful, and fun. While the initial setup process tries to cover as much as Google can conceivably cram in there, there are always things that you need to configure afterward — assuming you know where to find them. From little-known settings to the most prominent parts of your phone, here's how to make the most of your Pixel 6.
Ensure Call Screening is enabled
Call Screening was the very first Pixel Drop feature and it remains one of its most life-changing. After all, who wants to deal with 3-30 spam calls a day? No one!!
Call Screening doesn't just deny calls from specific numbers; it answers and screens suspicious calls. Using Google Duplex, Google will ask who's calling and what the call is about. Assuming the call is real and an actual person answers, Google will notify you and ask if you want to take the call or decline it.
We have a full guide to using Call Screening, but here are the basics:
- Open the Phone app.
- Tap the three-dot menu in the top corner.
- Tap Settings.
- Tap Spam and Call Screen.
-
Tap Call Screen.
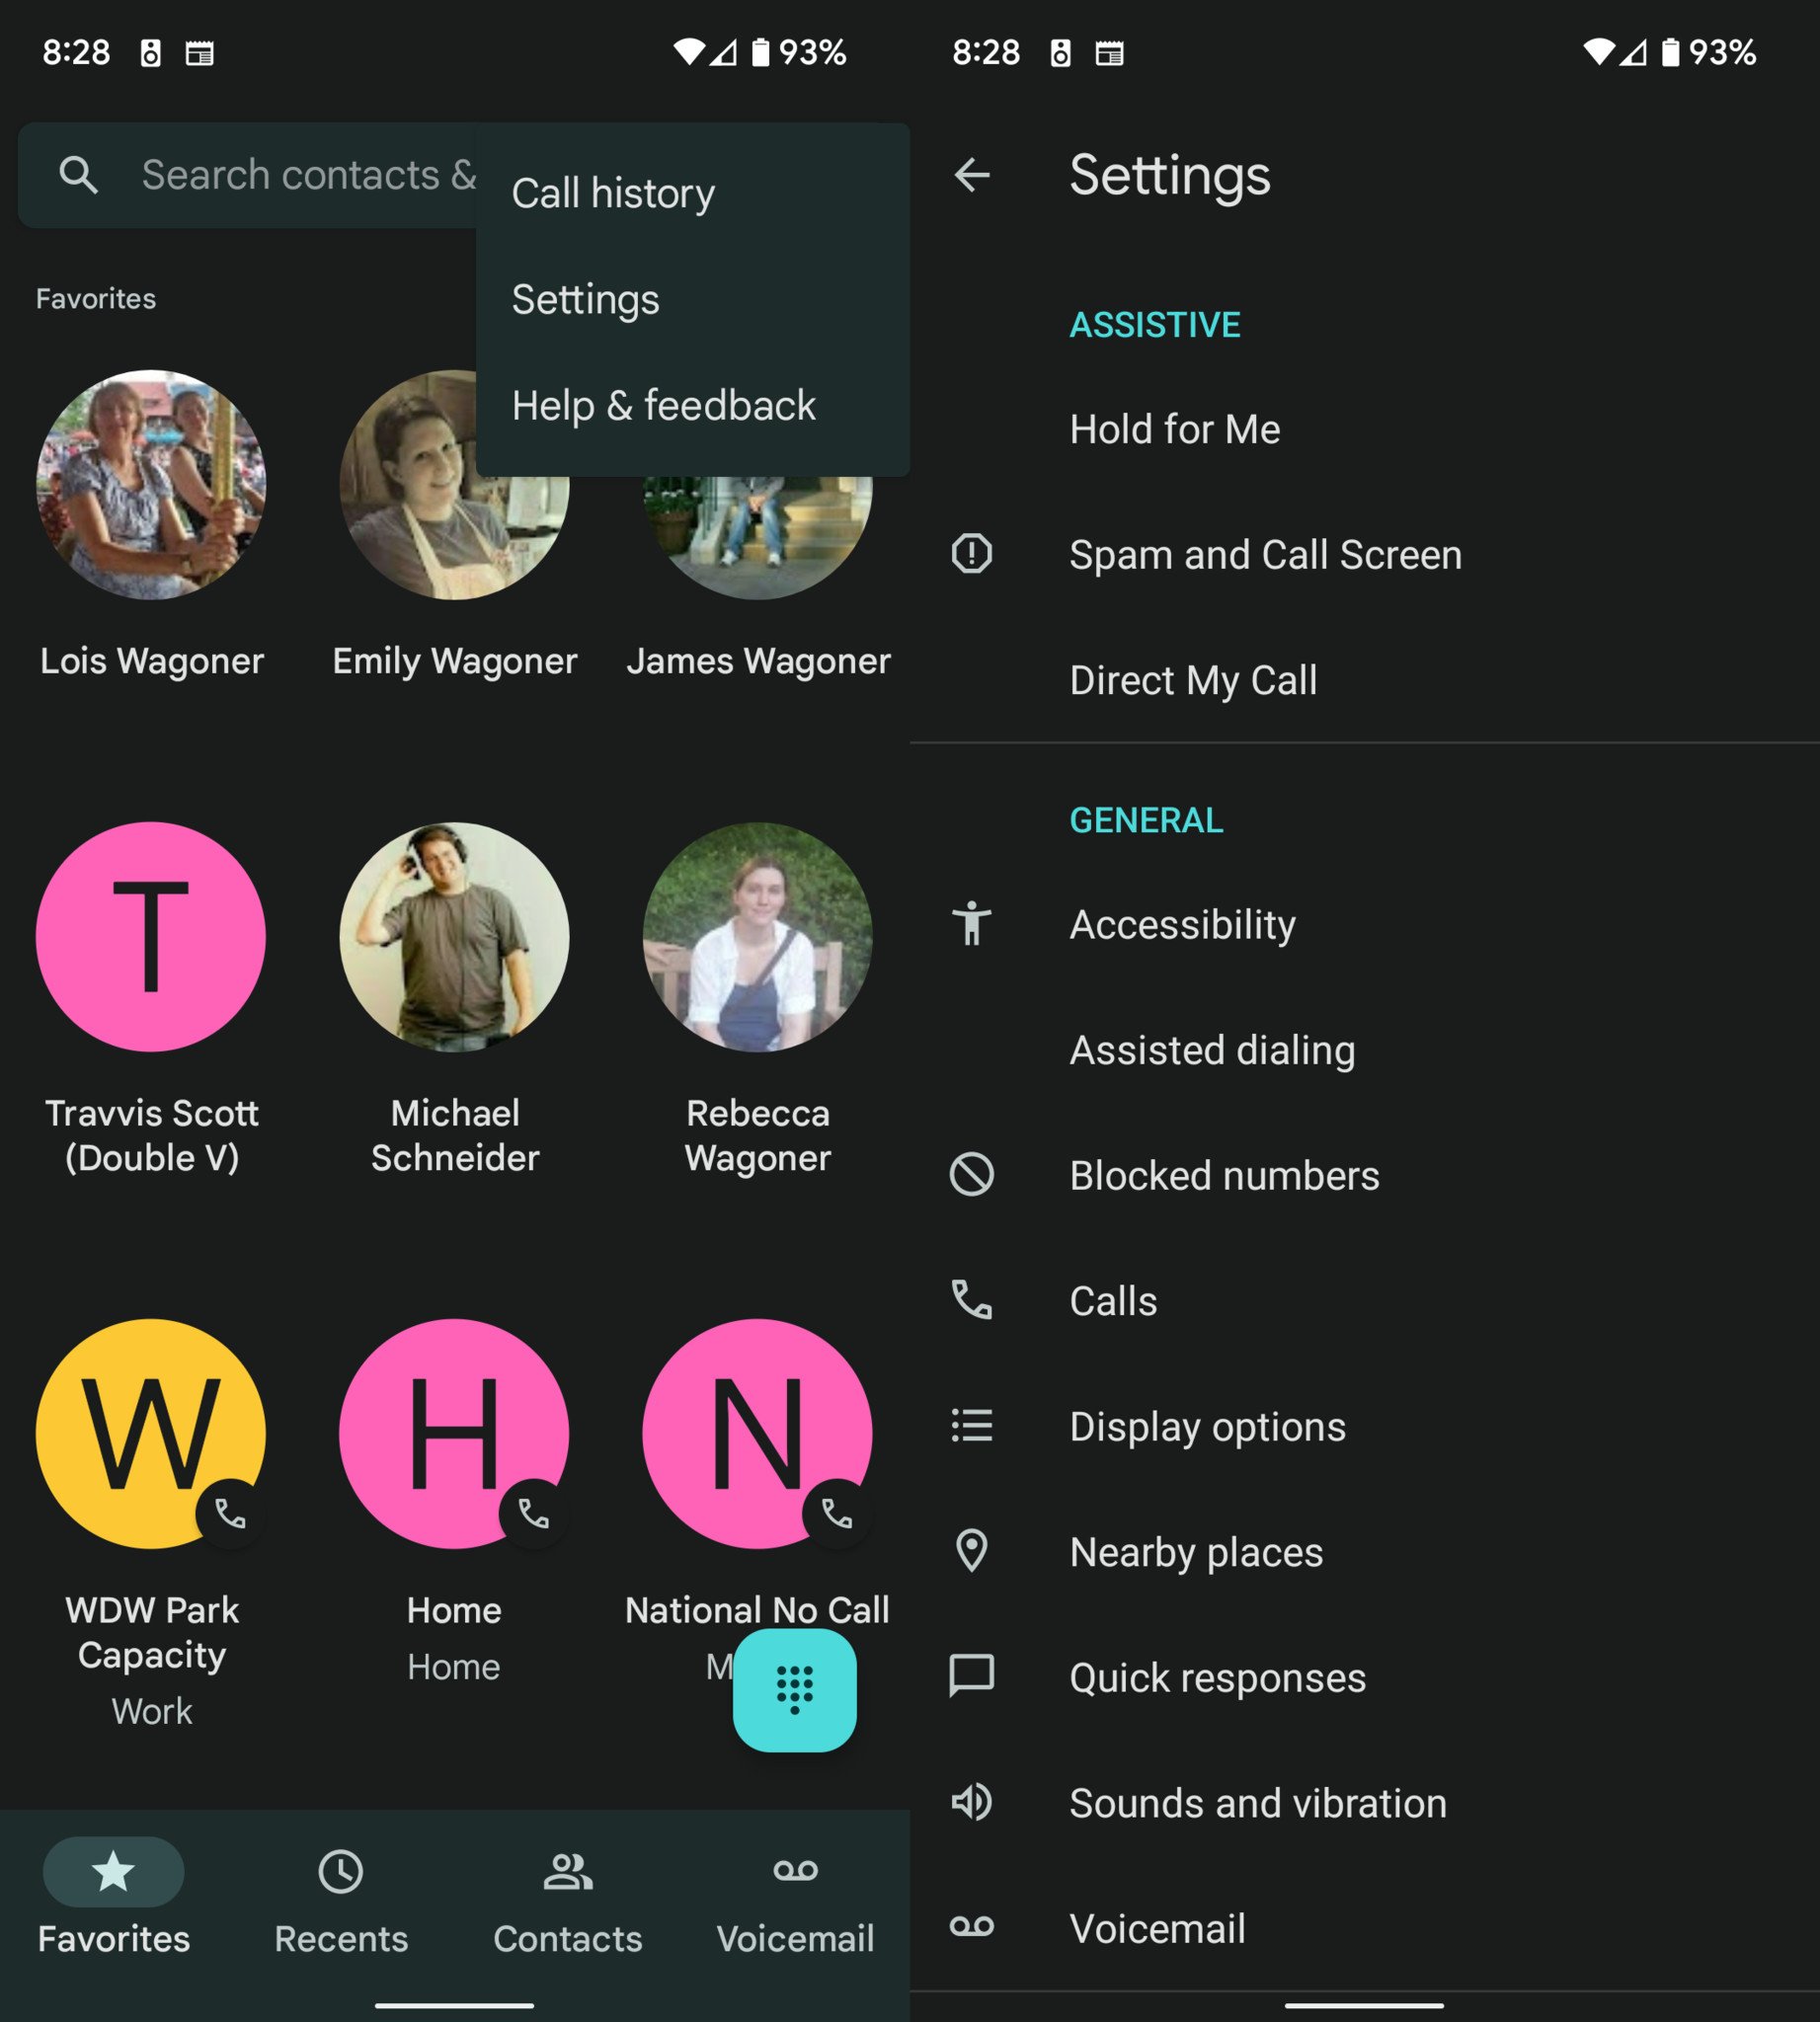

Once you're in here, you'll want to make sure your settings match the last screenshot: private, hidden, and first-time callers will ring directly with the option to screen the call from the incoming call screen, while spam and faked numbers won't disrupt you unless they say the right thing to Google Duplex.
Arrange your Quick Settings
![]()
![]()
![]()
One of the least-liked changes in Android 12 is that you see fewer Quick Settings on any given screen. 6 toggles atop the notification panel became 4, and 9-12 (depending on your manufacturer) became 8. It means that there's not a single spot to waste in your Quick Settings, so while you might've just let the default layout slide in the past, you almost certainly need to customize your quick settings in Android 12.
Before you click on that guide, though, I also want to talk about a few new and changed toggles. Firstly, as part of the new privacy dashboard and permission changes in Android 12, there are now Quick Settings toggles for device-wide Mic access and Camera access. I've been using the Mic access toggle when I'm doing one of my Netflix or Hulu binges, as Google Assistant is lightning fast on my phone and thinks I sound like the sassy female team member in half a dozen crime shows.
As a sidenote, when you turn off device-wide mic access, it means you'll have to turn it back on manually whenever you receive or make a call, because device-wide includes the phone app, too!
![]()
![]()
![]()
Another changed toggle this generation is the merging of the Mobile data and Wi-Fi toggles into a combined Internet toggle. Many old-fashioned Android users dislike this because they're used to just toggling Wi-Fi on or off depending on where they are, but I prefer the combined toggle.
Instead of totally "disabling" Wi-Fi — which didn't actually turn Wi-Fi off or save you any battery — if Wi-Fi is giving you a poor, inconsistent connection, you can tap Internet and then tap 5G/LTE. Android will stop connecting to Wi-Fi networks for a while, then get back to normal once you leave the Twilight Zone and head home where the Wi-Fi is strong.
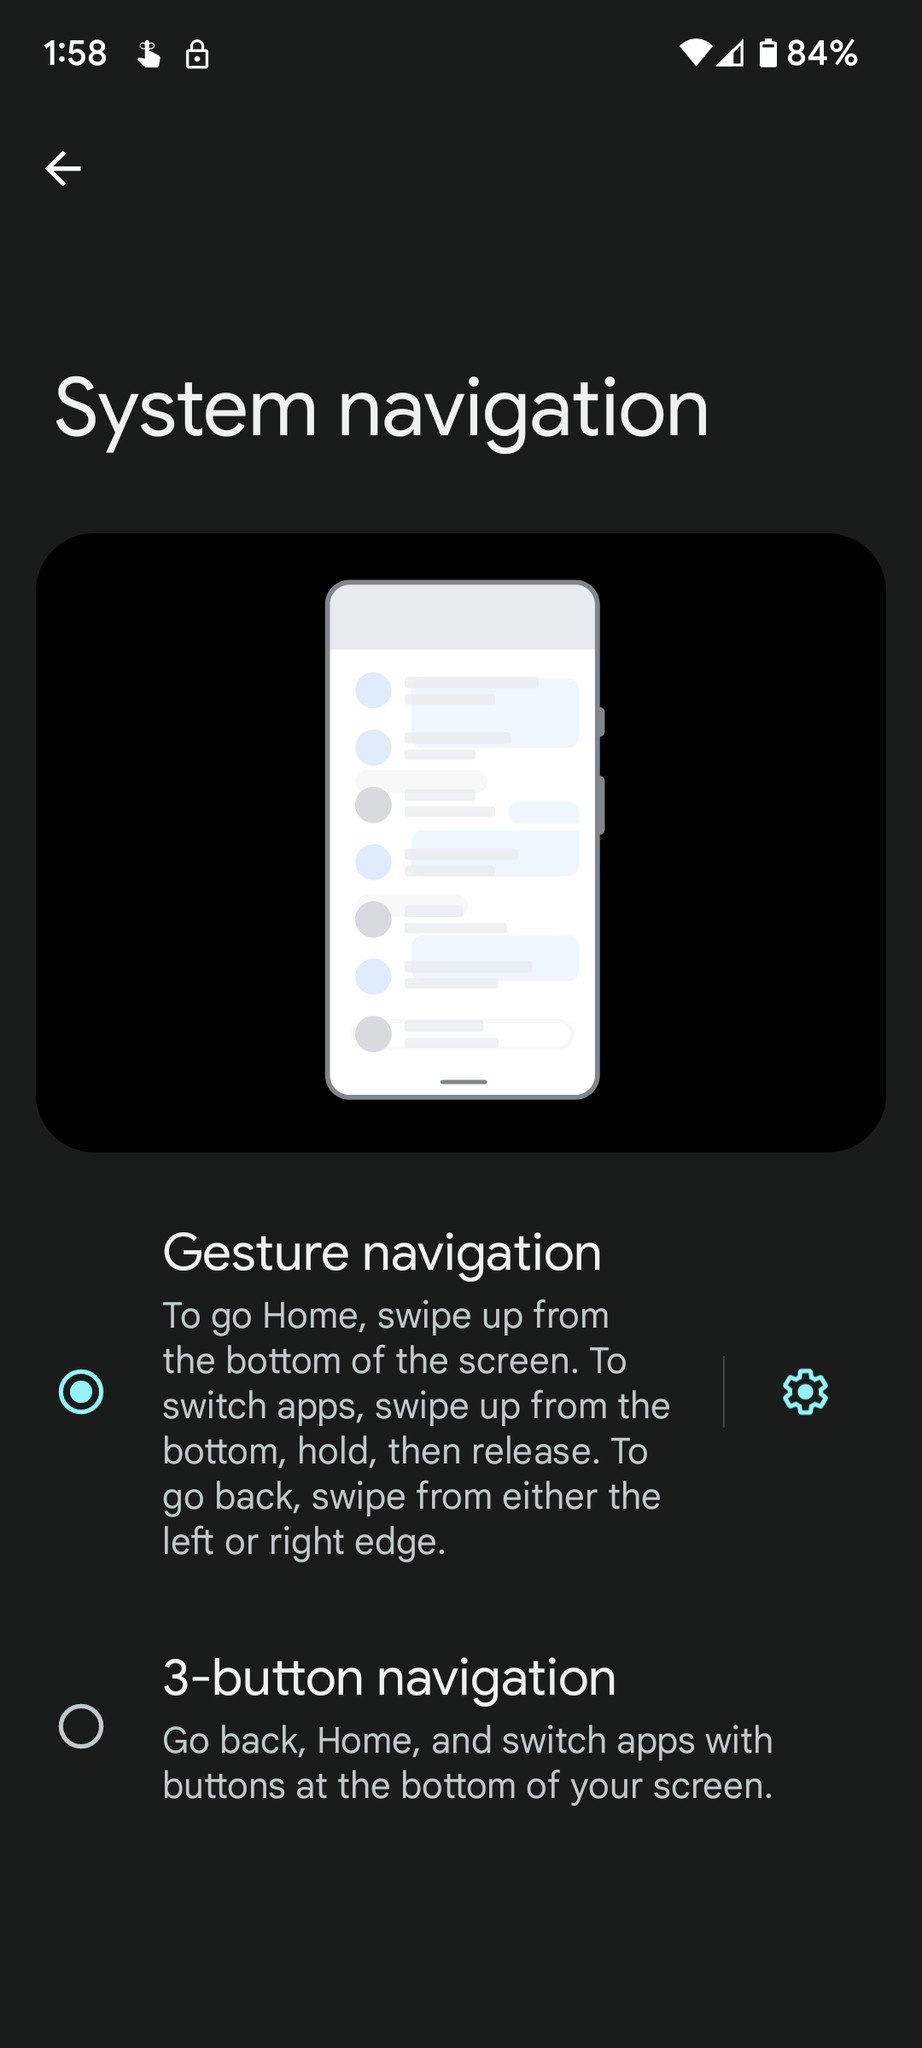
Set your system gestures
There's more than just taps and swipes when you want to interact with your phone. From double-clicking the power button to opening the camera with the Pixel 6's fancy new back tap gesture, there's plenty of gestures you can and should edit.
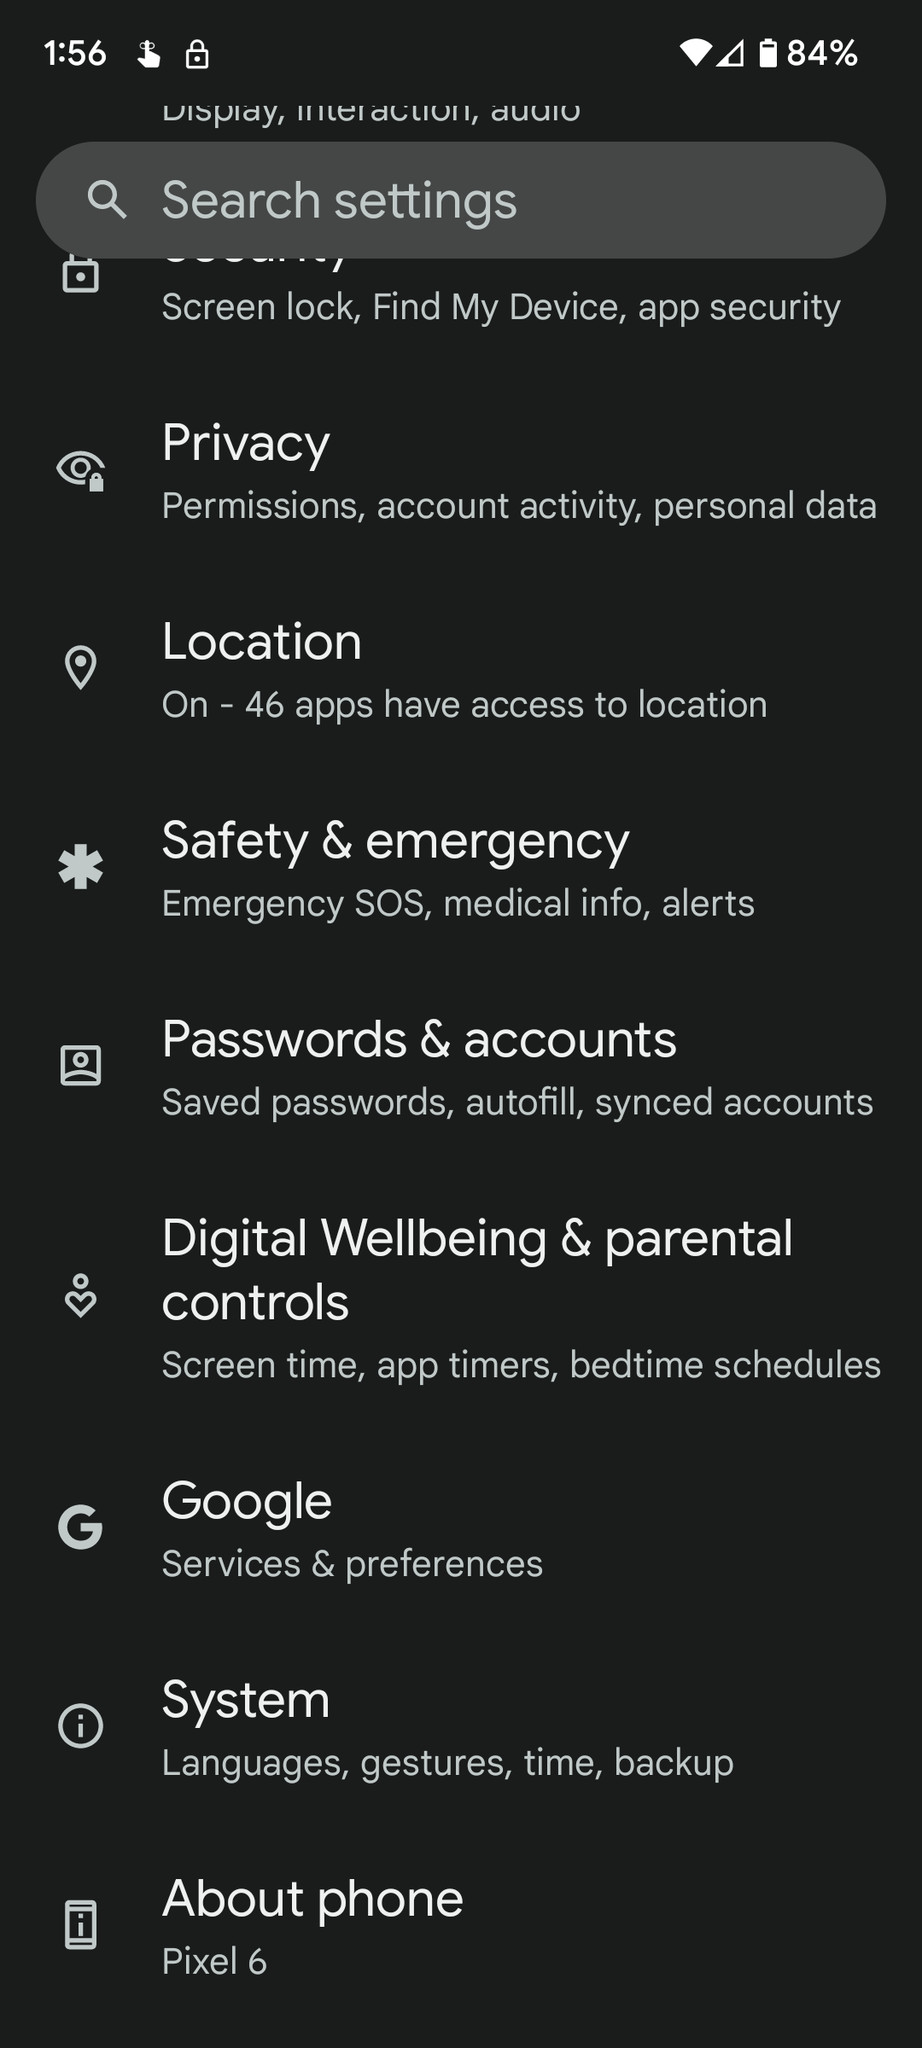
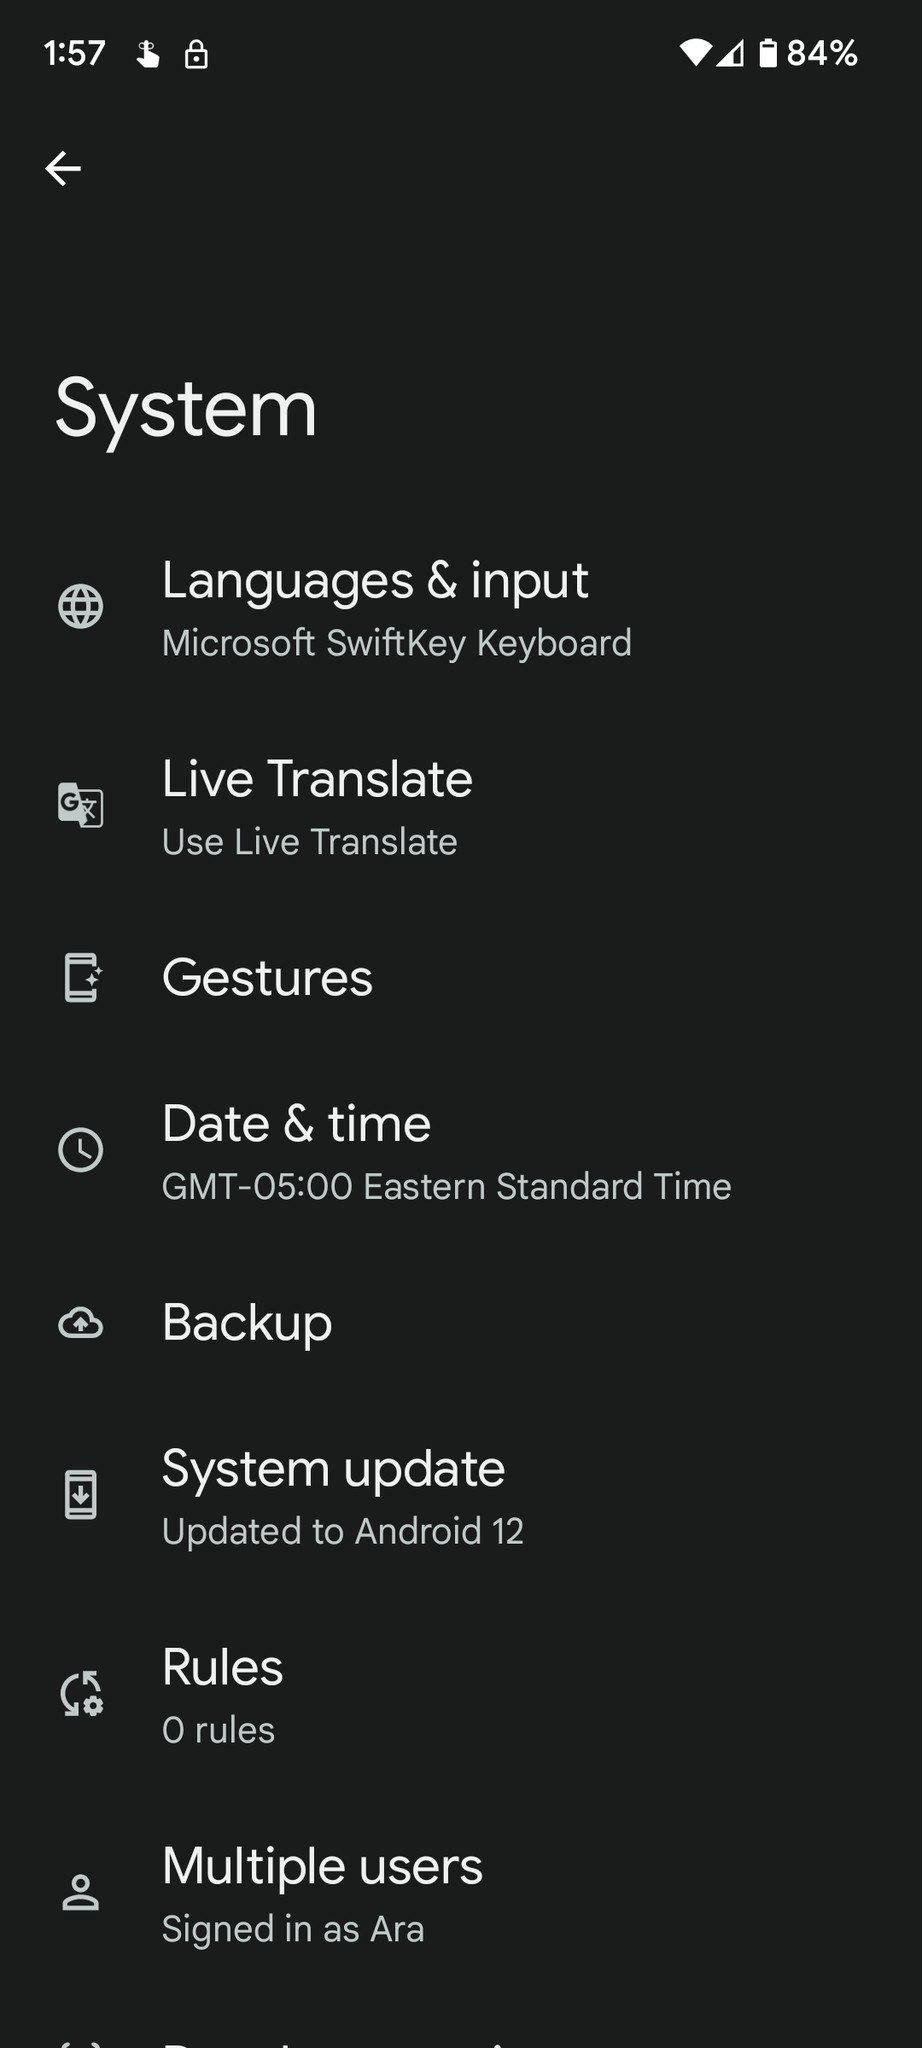
How to reach Pixel Gestures menu
- Tap Settings from your home screen or app drawer.
- Tap System near the bottom of the menu list.
-
Tap Gestures.
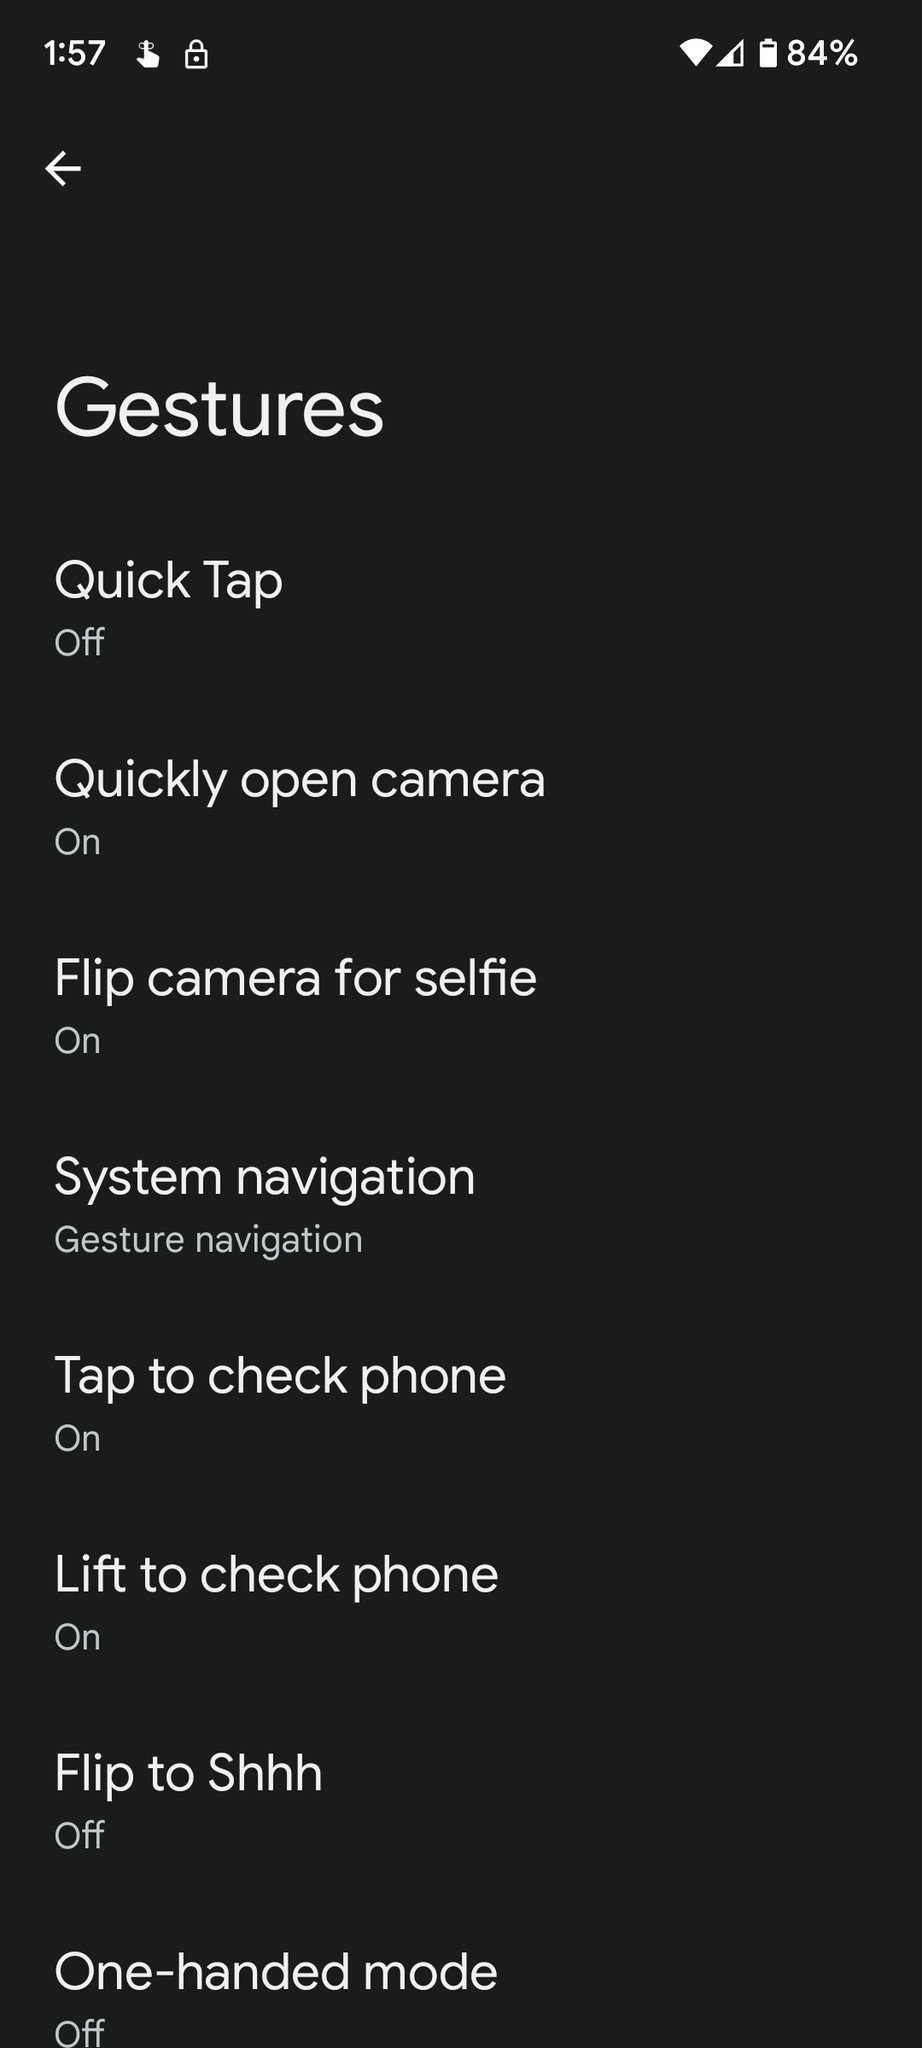
From this menu, there are three settings I suggest you edit — or at least evaluate.
- Quick Tap can be useful for triggering Google Assistant or as a screen-off play/pause control, but if you use a PopSocket (like me) or you have a thick case, triggering can be inconsistent and annoying, so you might want to turn it off.
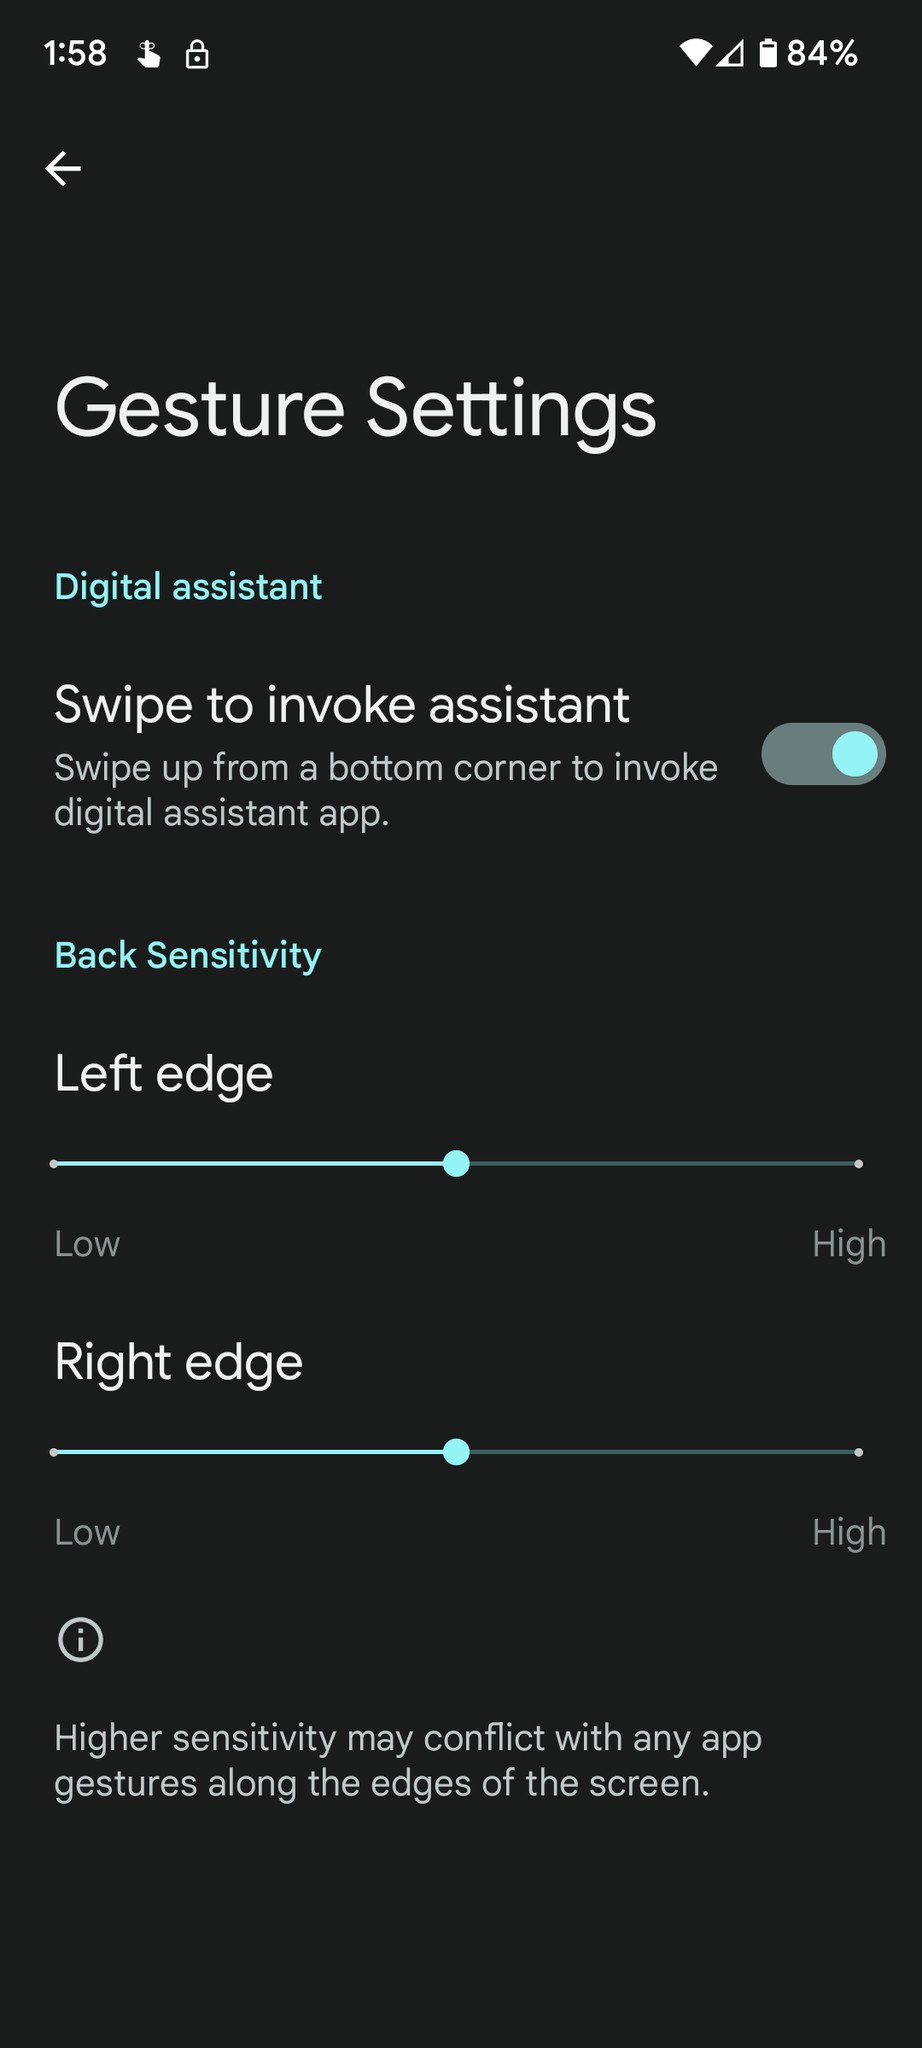
- Swipe for Assistant is buried under System Navigation and the gear icon next to Gesture navigation. This menu also lets you adjust the sensitivity of the back gesture if it's mistakenly triggering for you (or taking multiple swipes).
-
Press and hold power button is meant for the power menu, and so you'll likely want to toggle off Hold for Assistant to get that back. If you like Hold for Assistant, you'll press and hold power and volume down to get the power menu — yes, that used to be the screenshot shortcut, that's just a press now, not a press and hold.

I suggest taking a looksie through every gesture in the menu, as it can refresh you on gestures you might have forgotten. It can also teach you gestures you might not remember using before.
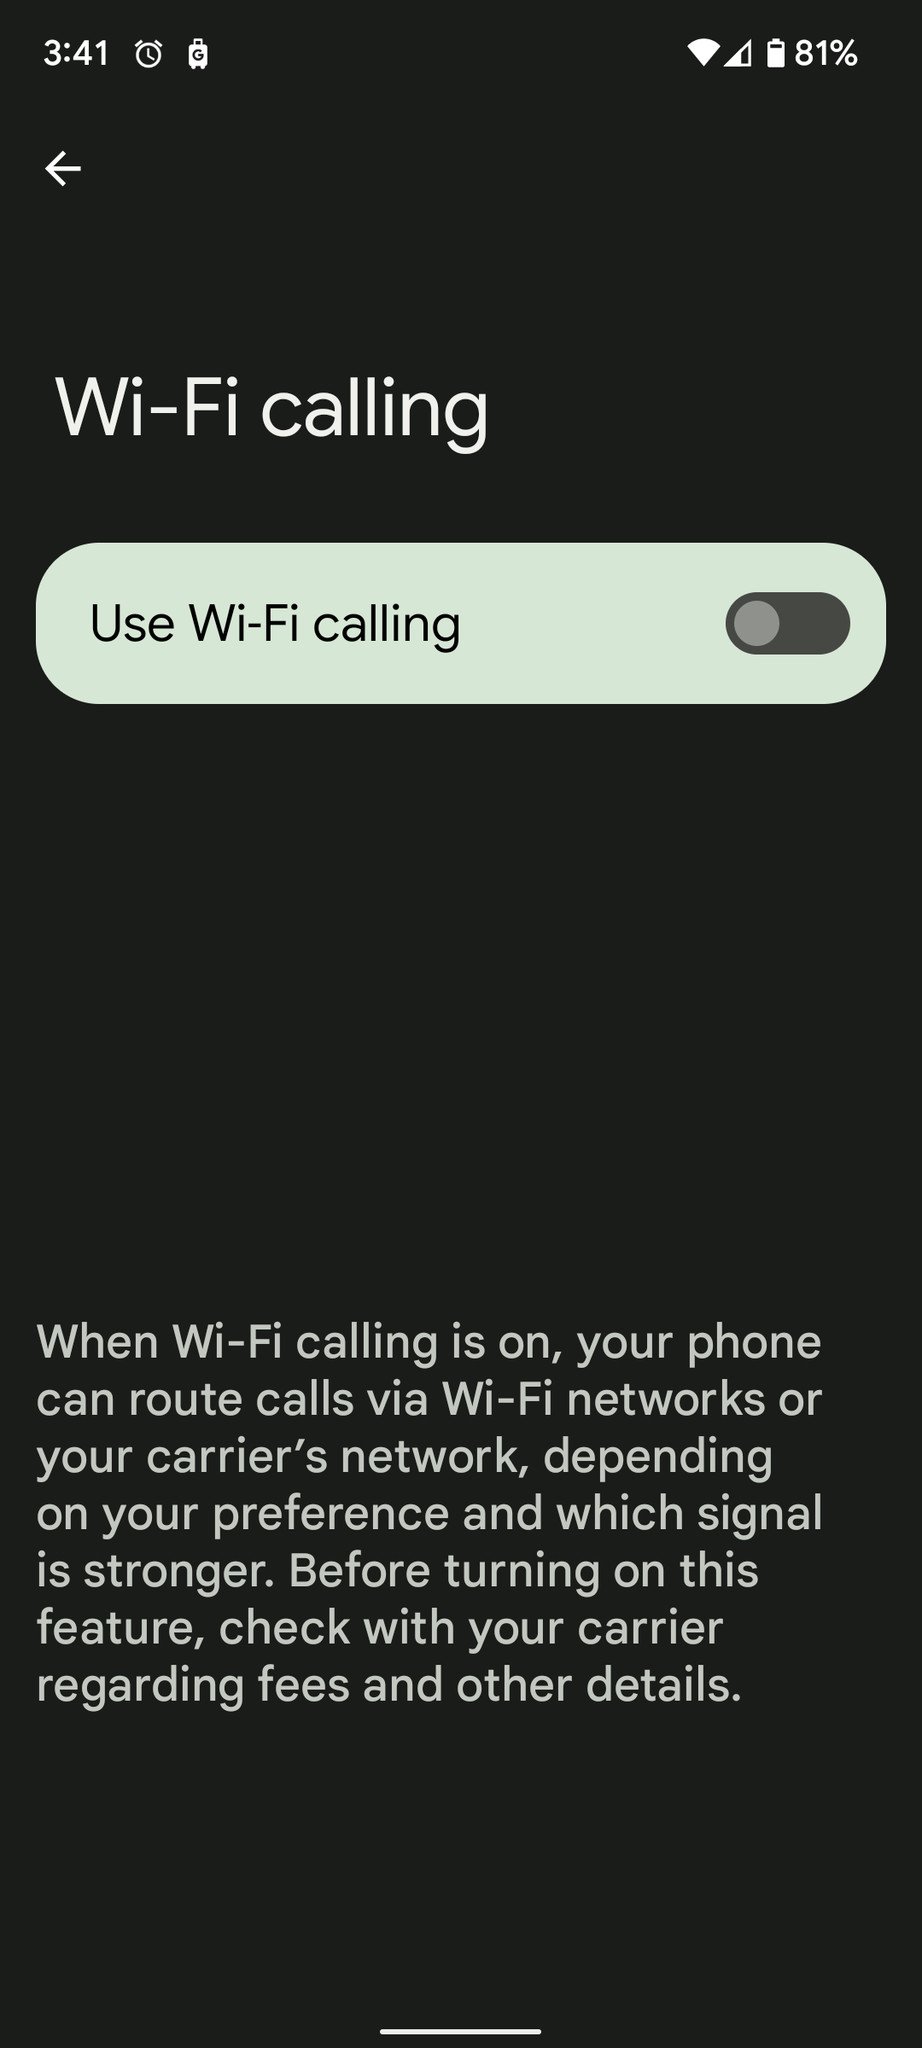
Turn on Wi-Fi Calling
Depending on your carrier, this might very well be enabled out of the box, but just in case it's not — or in case the E911 address is wrong — it's always a good idea to check it. Because Wi-Fi calls are routed through a router rather than your local cell tower, it can't automatically tell 911 dispatchers where you are. Because of this, Wi-Fi calling on some carriers requires you to verify your address info before you can turn it on.
Here's where to ensure Wi-Fi calling is on and your address information is correct.
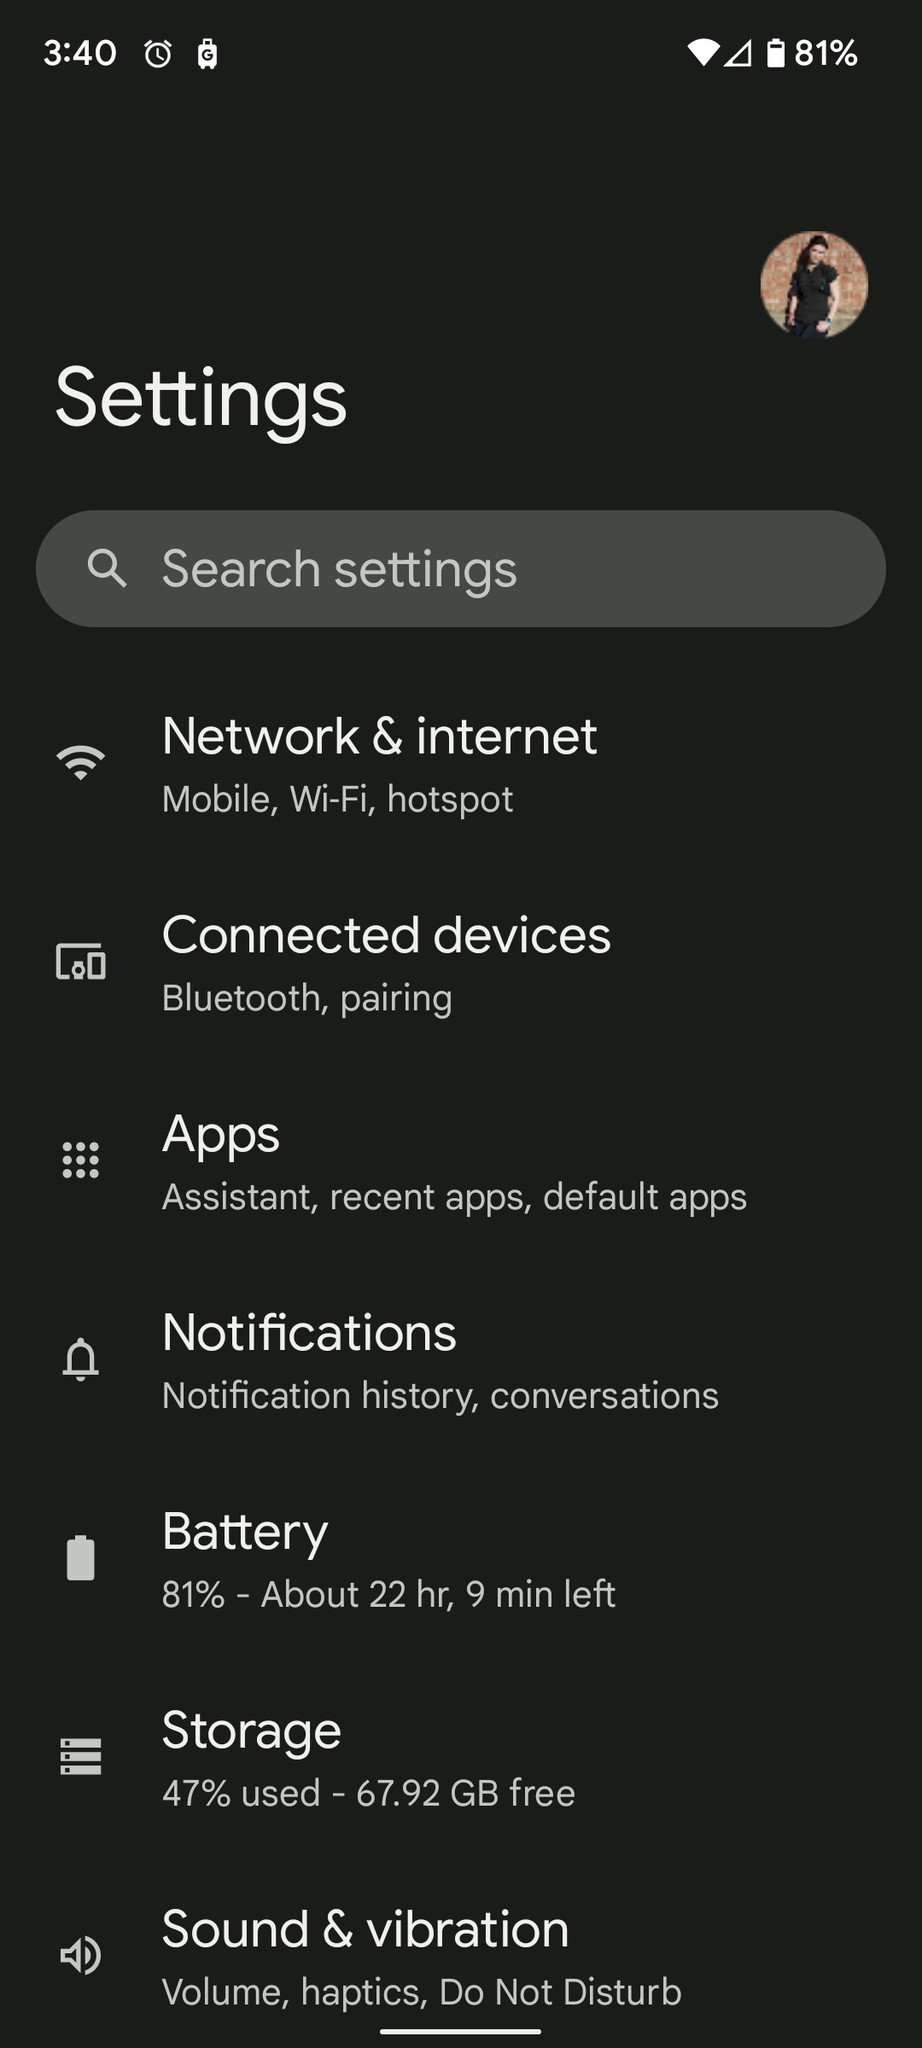
- Open Settings.
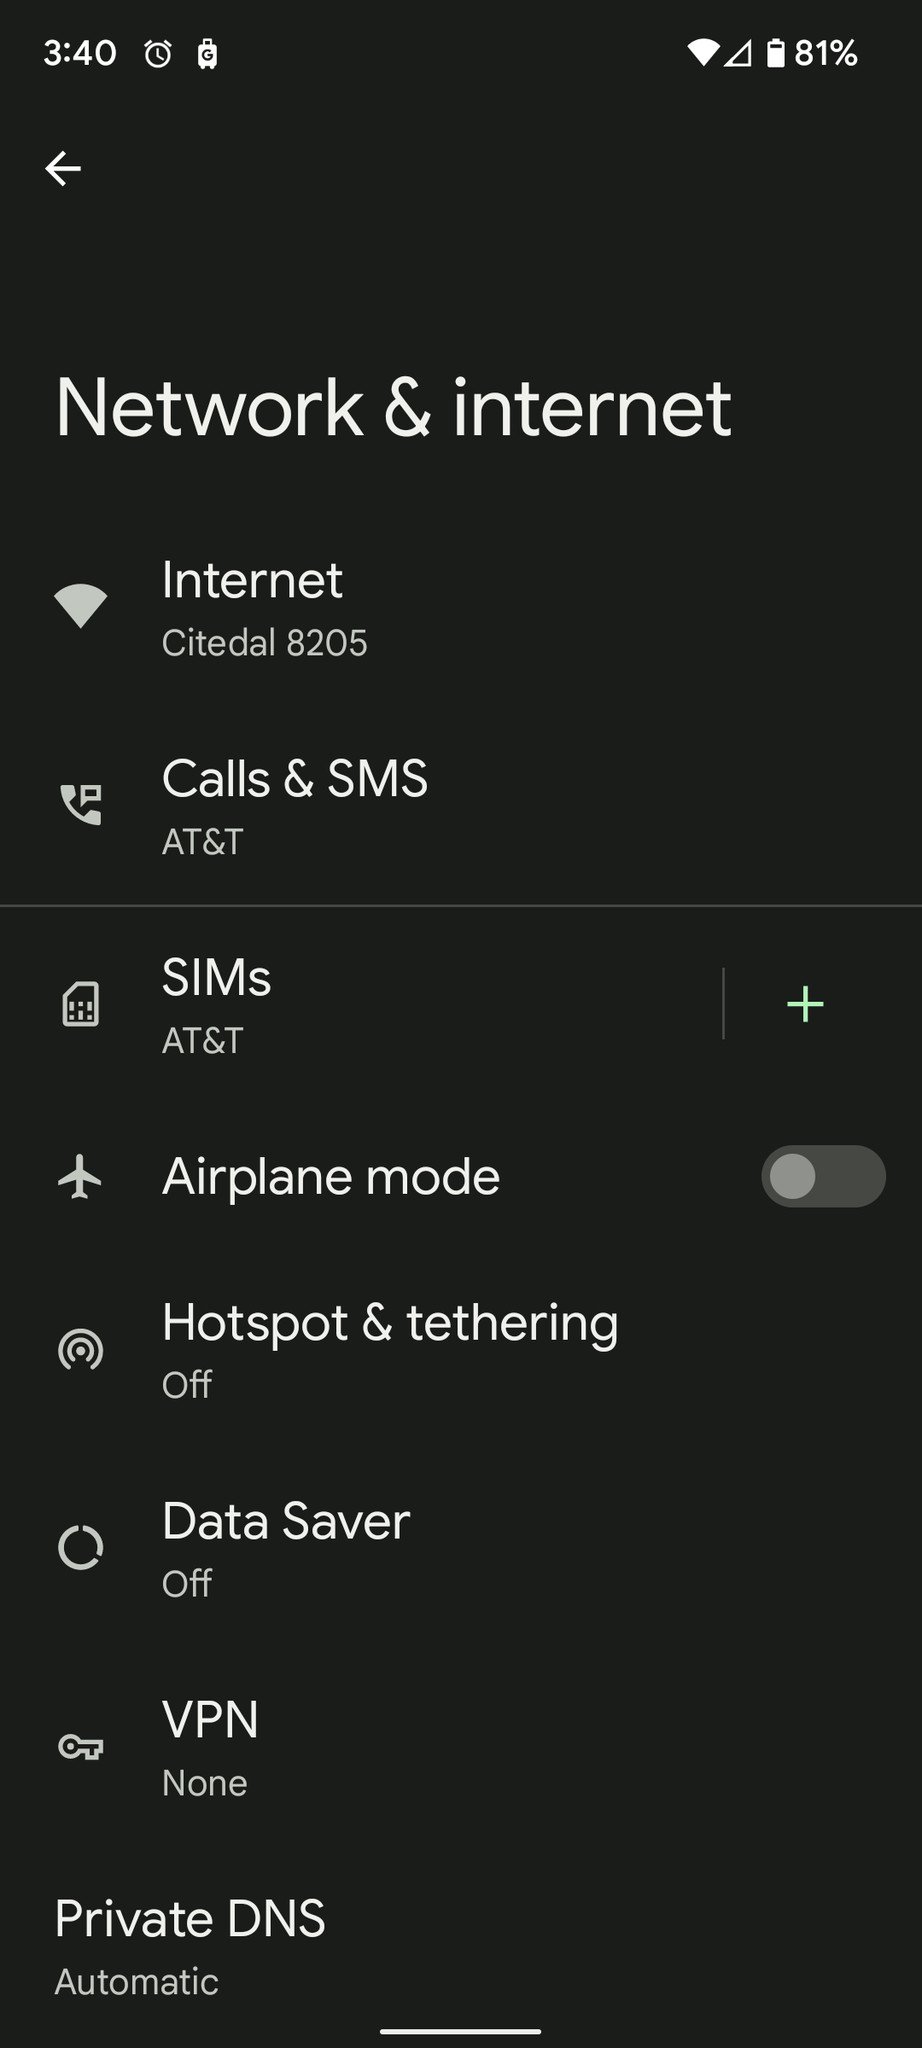
- Tap Network & internet.
- Tap SIMs.
-
Tap Wi-Fi calling.

- If the toggle is off, tap Use Wi-Fi calling.
- You should automatically be taken to the address info page; if not, tap Emergency Address.
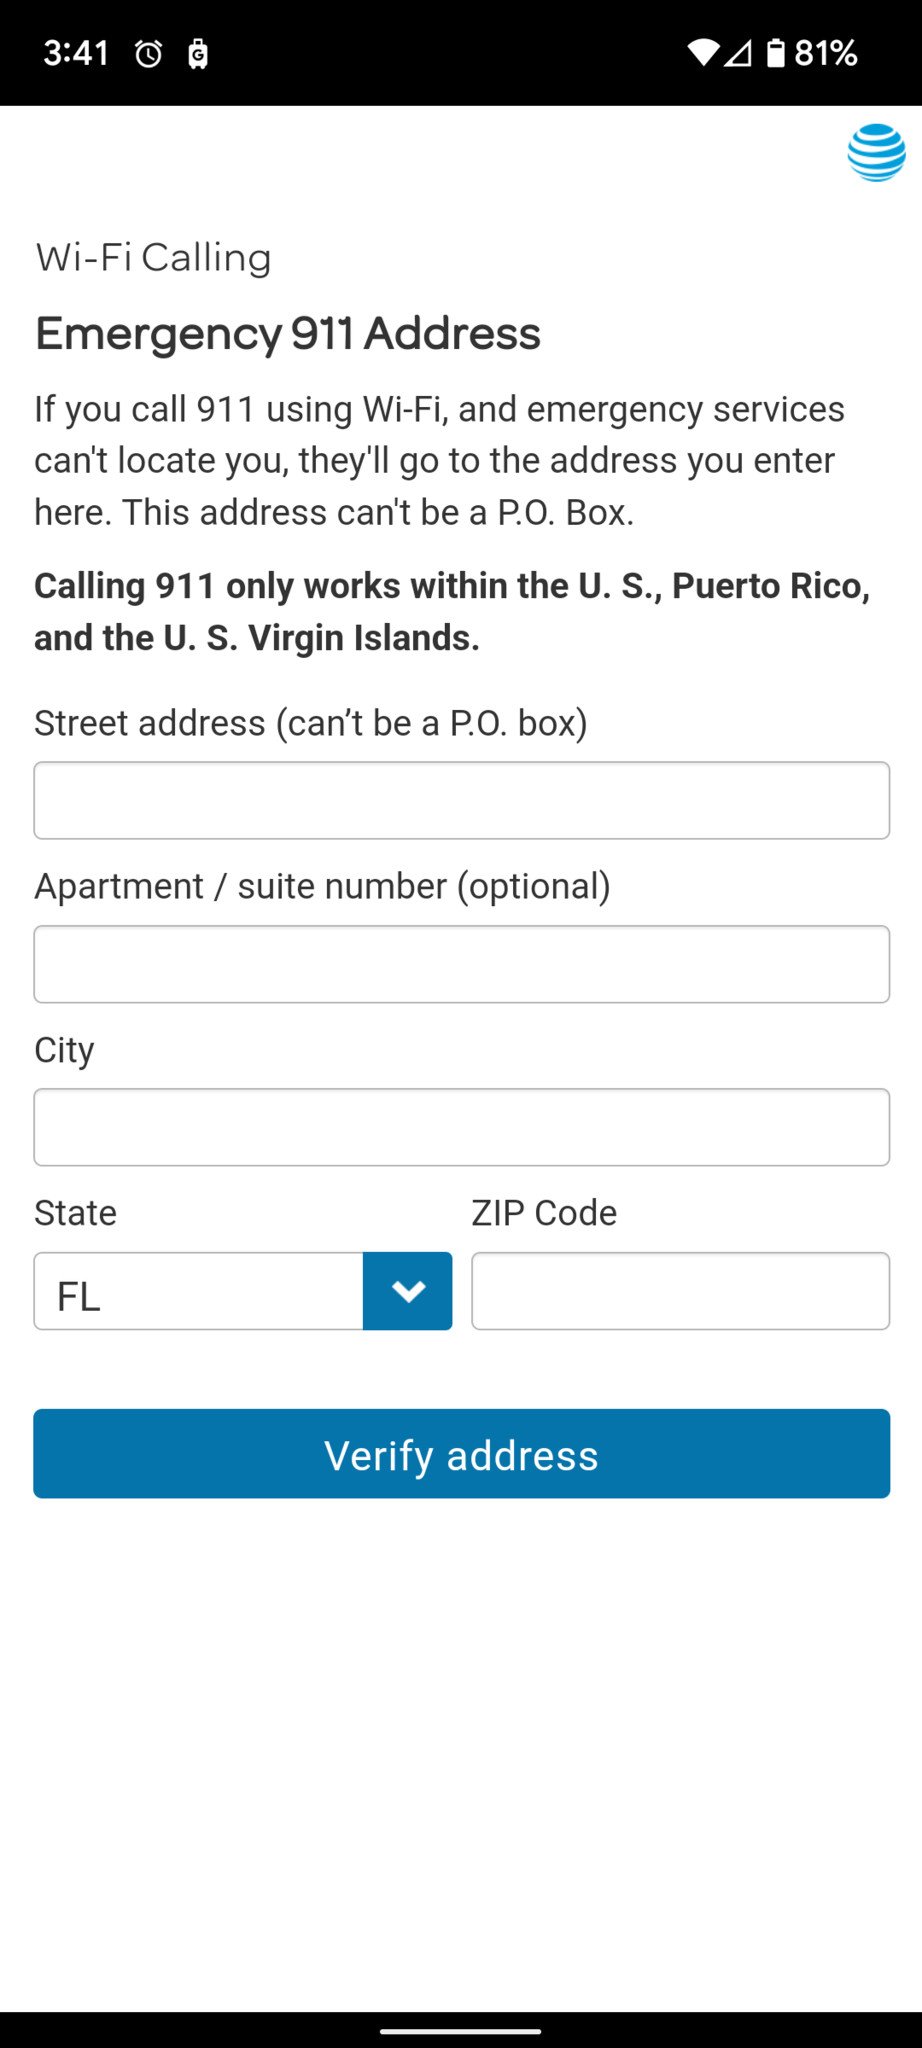
- Enter your address information if it needs changing — such as if you're on a family plan and don't live with the primary account holder.
-
Tap Verify address.
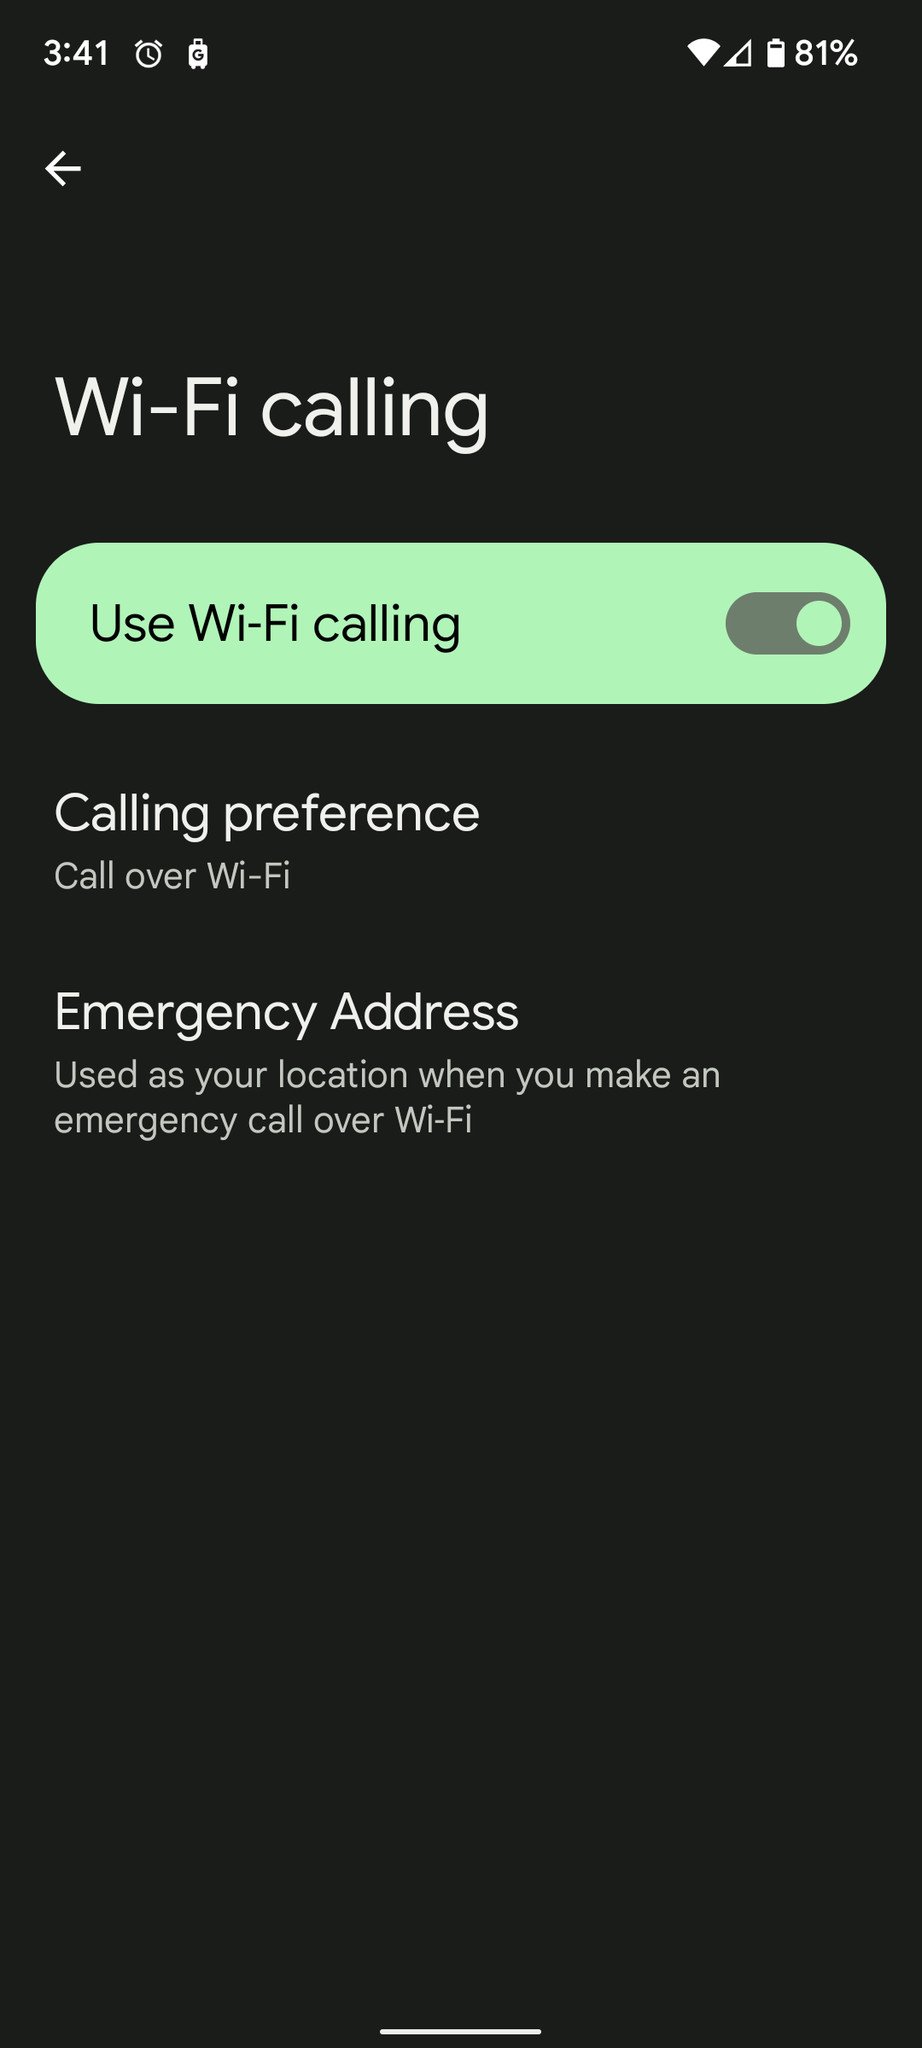
Another helpful setting to check out here is Calling preference. By default, it's set to prefer a mobile network, but if you live or work in an area with poor, intermittent reception, I suggest swapping over to "Call over Wi-Fi." This will default to Wi-Fi calling first, then use mobile data if the Wi-Fi isn't available.
Try Google Assistant voice typing
Normally I am the first to complain about the inconsistencies and awkward delays when it comes to voice typing on a phone, but the Google Assistant voice typing in Gboard is pretty impressive. Words appear the second I say them thanks to Tensor's AI processing prowess, and accuracy is about double compared to the voice typing on my previous phones.
The ability to insert emojis, better punctuate your phrases, and edit or delete a word or a whole sentence makes it much easier to type with your voice. For quick replies from your notification panel, just tap "Reply" and Gboard's mic icon; there's nothing faster. It's also great when my hands are hurting after a long day and I don't have the energy left to type.
The biggest catch to this best-in-class voice typing is that you only get the whole experience if you use it through Gboard. If you have a different keyboard app set — I've been a SwiftKey user for about six years now — you can summon Google Assistant with the usual phrase and command it to type something in for you, but you lose the spoken editing and easy deletion.
Just remember, like anything else Google Assistant-based, the more you've used Assistant over the years, and the more you use it for voice typing, the fewer mistakes you'll see.
Boost fingerprint accuracy
![]()
Many people have been complaining about the fingerprint sensor in the Google Pixel 6, saying that it isn't reliable. It actually is more reliable (precise) from a security standpoint, but that also means a higher risk of bad reads if your screen is schmutzy or your fingers are oily.
It's more secure, but at the cost of convenience.
Users have tried several methods to improve the good read/bad read ratio. No, the fingerprint calibration tool does not help unless you broke and replaced your screen, and while moisturizing your hands is an excellent idea as the dry, biting winds of winter arrive, if you use too much (or too often) it just makes your hands greasy, increasing your chances of a smudged read. (Please, moisturize responsibly.)
In our experience, there are two things you can do the really will improve your experience: check your screen protector and enroll your fingerprints twice. You can have up to five fingerprints registered, so you can enroll both thumbs twice. Having the fingerprint registered twice means that the print can match against two profiles, doubling the chance your fingerprint matches on the first try.
![]()
Google used an optical sensor under the Pixel 6 and 6 Pro screens, so in theory, there shouldn't have been any compatibility issues with Pixel 6 screen protectors, but users have experienced the fingerprint scanner becoming essentially useless after applying a screen protector.
If you're using a tempered glass screen protector, it's one that's Made for Pixel. Admittedly, there's not a lot of those right now, but many heavy duty Pixel 6 cases with built-in screen protectors have a circle of adhesive so that the sensor has a clear, bubbleless surface for fingerprint reads, so that's another option while we wait for ZAGG and OtterBox to catch up supply to meet demand.
Are you keeping Pixel Launcher?
![]()
I know that buying a Pixel is all about the software and the cameras — though the Pixel 6 is a pretty swanky phone all-around — but the one part of the Pixel experience I always disable immediately is the Pixel Launcher. I swap out for a better Android launcher, specifically Smart Launcher 5 because it still lets me have Adaptive icons through Icon Pack Studio.
On most phones, the launcher that comes on the phone is okay, but the Pixel Launcher is lacking in many ways. The biggest grid you can get is 5x5, which just wastes tons of vertical space on your home screen and massively limits widget placement. You also have At a Glance taking up the top of the screen whether you turn it on or off, and the all-important search bar sits across the bottom.
In short, Pixel Launcher is inefficient.
![]()
Pixel Launcher isn't all bad, though. If you stick with the Pixel Launcher, you get home screen icons that adjust with Material You widgets whenever you swap wallpapers. It's the iconic Pixel look from all the marketing materials, but you can't fit nearly as much on your home screen at once.
Because Material You widgets can be applied in any launcher and as I said above, you can get adaptive color icons — actually more colorful versions of adaptive icons, it pulls 2-5 colors — you don't have to stick with the Pixel Launcher to get a custom Material You look. It just takes a little more setting up than the Pixel Launcher's out-of-the-box solution.
Make the most of Material You
![]()
Once you decide on a launcher, I need you to do something for me that you might not have ever done before. It'll seem weird, but you just have to trust me; it will make your Pixel 6 experience better.
I need you to add widgets to your home screen.
I know Android widgets earned a rap as ugly and awkward years ago, but Android 12 is finally changing that. Google has rolled out updated widgets for most of its apps, and there's even a handful of popular apps that have already updated tom match.
The new Google Keep widget looks amazing and scales beautifully, and YouTube Music's Turntable widget keeps things simple yet fun. Google's done an impressive job with its weather widget, too: it can be as small as a 1x1 current temperature or it can be a 4x3 hourly and multi-day forecast.
![]()
Once you've tried out one widget, I all but guarantee you'll find another worth adding. And if you run out of Google and third-party Material You widgets to try, there's a wide array of Material You KWGT packs to sink your teeth into.
Last but not least, set a fresh wallpaper and see how Material You lets your home screen come alive under different palettes. The Google Wallpapers app has tons of great designs — I particularly like the Art section's Magic ginkgo, Seashells, and Urban scene — but if you're looking to try something new, we know where to find the best wallpapers on Android.
Protect your investment
![]()
Last, but certainly not least, please, please, please protect your new phone, front and back. While we mentioned the shortage of Made for Pixel tempered glass screen protectors, most film protectors like ArmorSuit and SuperShieldz will offer scratch resistance and haven't seemed to interfere with the fingerprint sensor yet.
Moving on to protecting the rear glass and that thicc, thicc camera bar, there are plenty of options when it comes to both Pixel 6 cases and Pixel 6 Pro cases. Pixel 6 Pro cases — especially name-brand cases — have been hard to keep in stock, another testament to the Pixel 6 Pro's popularity.
![]()
Among the current crop of cases, the Caseology Parallax and Vault have felt great on my Pixel 6 while staying on the slim side. If you need more functionality with your style, the Poetic Revolution and i-Blason Cosmo bring a little bulk and a lot of protection to your new Pixel.
Another investment I'd ask you to highly consider is a PopSocket or phone grip, and you'll want it on the Pixel 6 for three reasons. First, the Pixel 6 and especially the Pixel 6 phones are sizeable phones, and a PopSocket will help you reach more of the screen without straining your thumb and causing an RSI.
Second, you can avoid another potential RSI: gripping the PopSocket rather than the bottom of the phone helps you avoid pinky-propping. Holding up a phone this solid and weighty by your smallest finger is a recipe for making your hands hate you forever. My left pinky is screaming at me as I type these very words; do not end up like me.
Thirdly, PopSockets add style and personalization to your Pixel 6 without having to sacrifice build quality or drop protection by buying a custom, licensed case. You'll find sports team logos, characters from more pop culture franchises than you can throw a PopGrip at, original designs, charity designs, and even special material PopGrips and PopTops that give a unique and oh-so-satisfying feel.
![]()
Now that you've got everything squared away, the only thing left to do is enjoy your shiny new Pixel 6. Go take those sweet new cameras for a test drive, and then see which Material You theme works best with your style.
Pixel perfected
Google Pixel 6
![]()
Google presents a proper Pixel flagship (finally).
Tensor's AI prowess makes most Assistant features feel magically fast to match its bold design. Major camera updates for both hardware and processing take Android photography to new levels, and five years of security updates will ensure this phone stays safe and up-to-date.
From $599 at Amazon From $599 at Best Buy From $599 at B&H From $10/mo at AT&T Free w/ trade-in at Verizon
Source: androidcentral